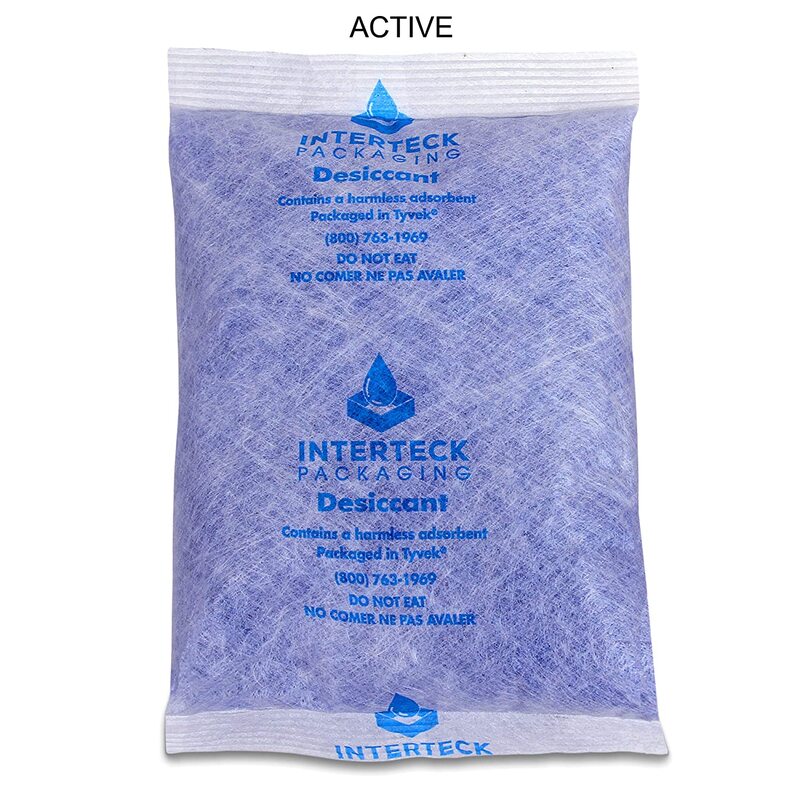
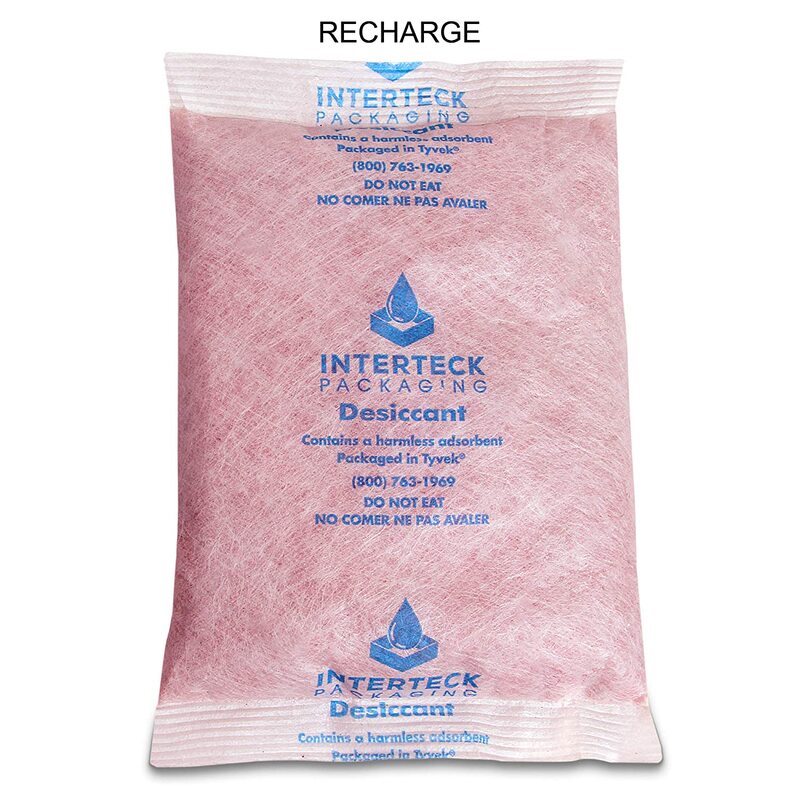
Dehumidifiers to Keep Your Stored Firearms Dry When you are not carrying or shooting your firearms they need to be stored away. In our experience storage is driven by two main factors: safety of the firearm and protection of the firearm from the elements. In most cases safety varies by situation – and is highly dependent on the laws of the State you live in, the people in your home and your perceived need for speedy access to your firearms. The second storage concern relates to the steps that you need to take to keep your firearms in good working order to protect their metal parts from rusting and their wooden parts from drying out and cracking. Consequently, the first question related to firearms storage is how are you storing your firearms, and the second question is how are you controlling the environment that they are stored in; primarily temperature and humidity. So this raises the question of what is the proper temperature and humidity for storing a firearm. It’s generally agreed that you should store firearms in a moderate dry location; with the accepted norms being between 60° and 70° Fahrenheit and ~50% relative humidity – where neither of these variables change rapidly over time. Because we like to be able to easily grab a specific firearm to take to the range, we store our firearms in their carrying cases; a practice that is frowned upon by many people and is impractical in many parts of the world due to the local weather. But for us, since we live in the Northeast US and store our firearms indoors, the temperature and humidity stay fairly constant throughout the year – so that’s how we store them. But recently we decided to take one additional preventative measure to ensure that excess humidity does not lead to any of our firearms rusting. We decided to add silica gel dehumidifiers to absorb the moisture in the air around the firearms while they were stored in their cases. These days we’re all familiar with silica gel packs since they seem to show up in the boxes of all sorts of products that we purchase. But we wanted something a little larger and a little tougher than the everyday packets. So, after searching the internet, we decided to purchase some Interteck Packaging silica gel desiccant packets. 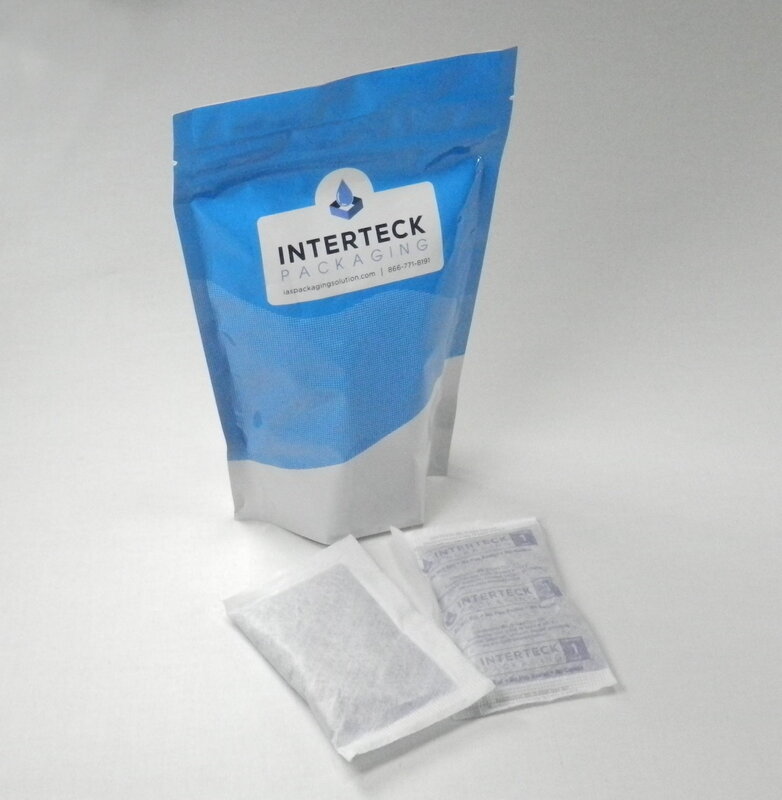 The Interteck Packaging silica gel desiccants measure 3 inches by 4 inches, are made of Tyvek, weigh 30 grams, can absorb 10 grams of humidity (~6 teaspoons) and come 8 to a package. Silica gel desiccants lower the amount of moisture in the air around them by absorbing the moisture and holding it. They do not “get rid of” the moisture. The silica beads just absorb the moisture and hold onto it. So the packets need to be replaced eventually. Because of this you need to know when the packets have lost their ability to absorb any more moisture – which is another great feature of the Interteck Packaging silica gel packs – the silica beads change color from “blue” to “pink” when they have absorbed all of the water that they can. This makes it extremely easy to see when to replace them. You can purchase the Interteck Packaging silica gel desiccant packets on Amazon.
If you want more detail on the proper storage of firearms - here’s a 7 page paper from Doug Wicklund, the Senior Curator from the NRA’s National Firearms Museum, on “Caring for Your Collectible Firearms”. 
0 Comments
Bought Some New “Reactive” Training TargetsFrequently we’re at the shooting range either trying to help someone learn to shoot, sighting in a new firearm or optic, or just trying to improve our skills. To help support this we have a variety of targets – with all sorts of shapes, markings and graduations. Every once in a while we’ve run across targets that are marked to help you improve your accuracy – especially with a handgun. Over the years we’ve even purchased a few of these targets to try them out. But we’ve never loved them because they were paper targets that didn’t allow you to easily and clearly see where the rounds you shot hit the target. This week we were browsing around one of our local gun shops and ran across the Birchwood Casey Shoot-N-C Handgun Trainer “Reactive” Targets (BC-34655). We use lots of other Birchwood Casey “reactive” targets all the time, so we picked up a few to try them out. 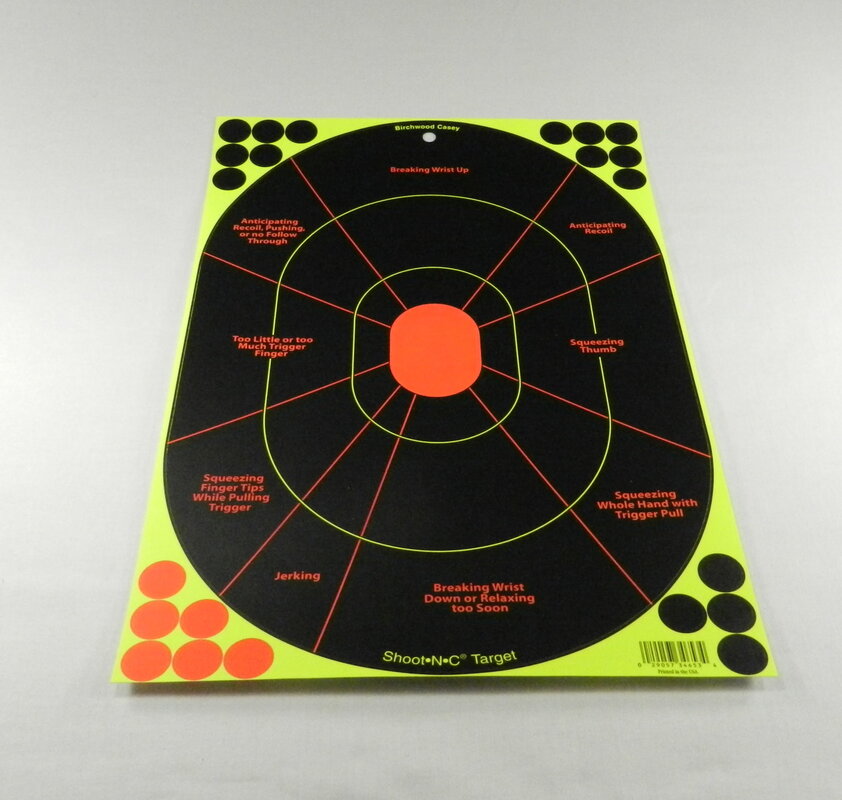 Like the training targets that we’ve tried before, these 12" X 18" rectangular targets are broken up into a bulls-eye and 9 other areas with labels to identify the action that you need to correct to improve your accuracy (listed in clockwise order starting at 12:00) :
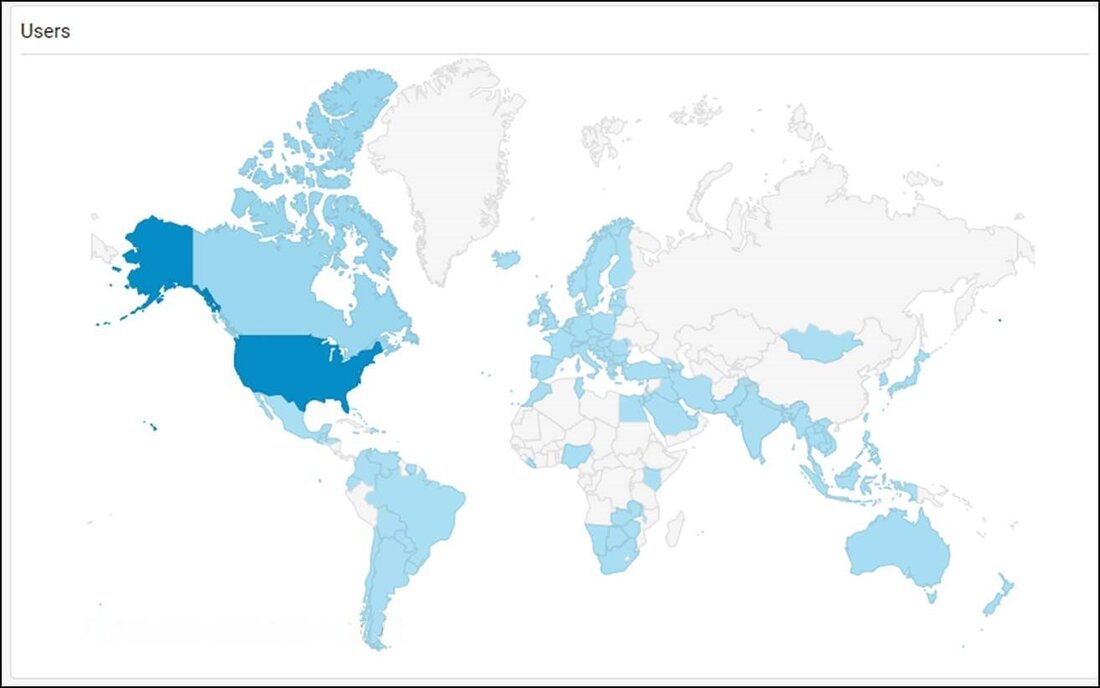
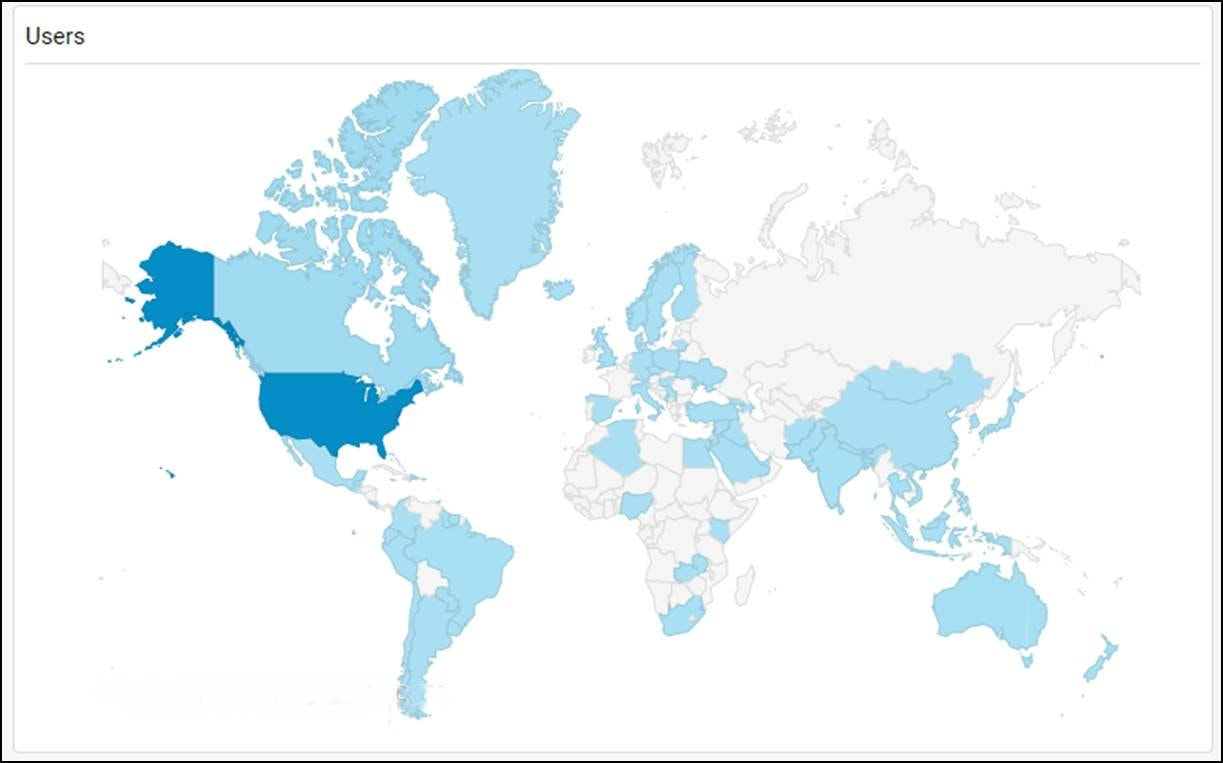
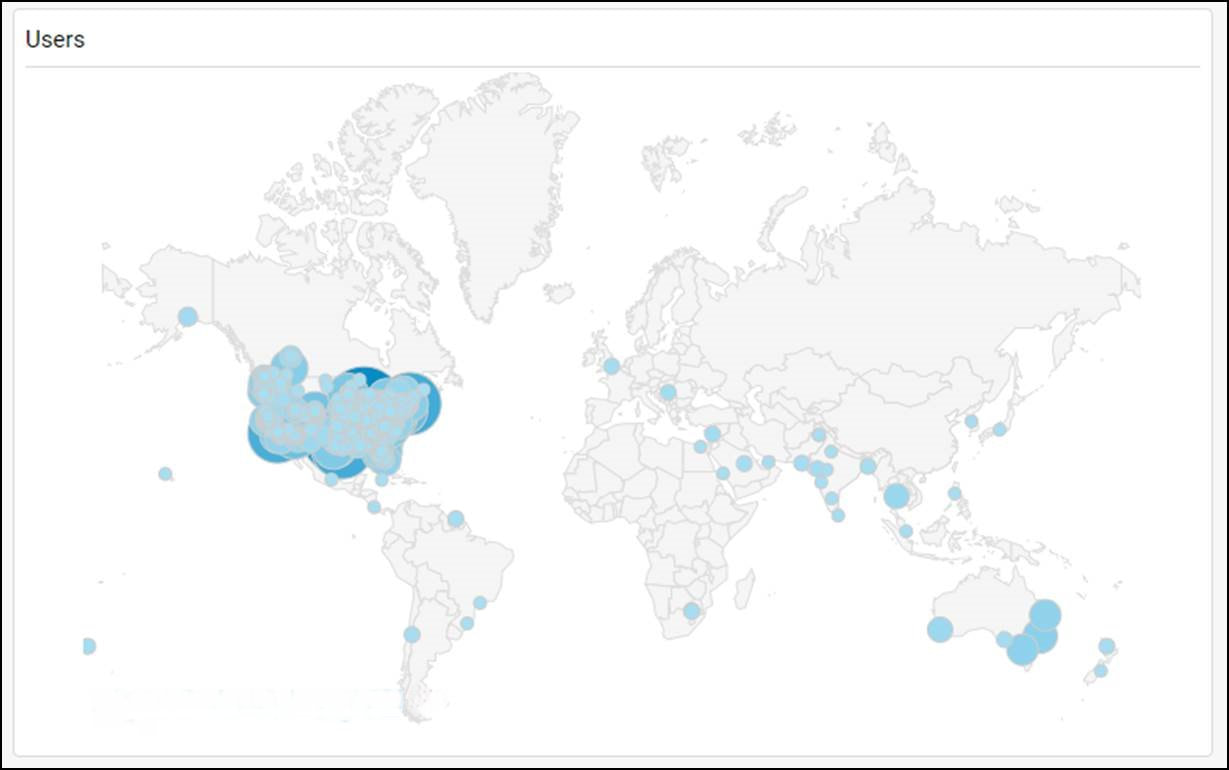
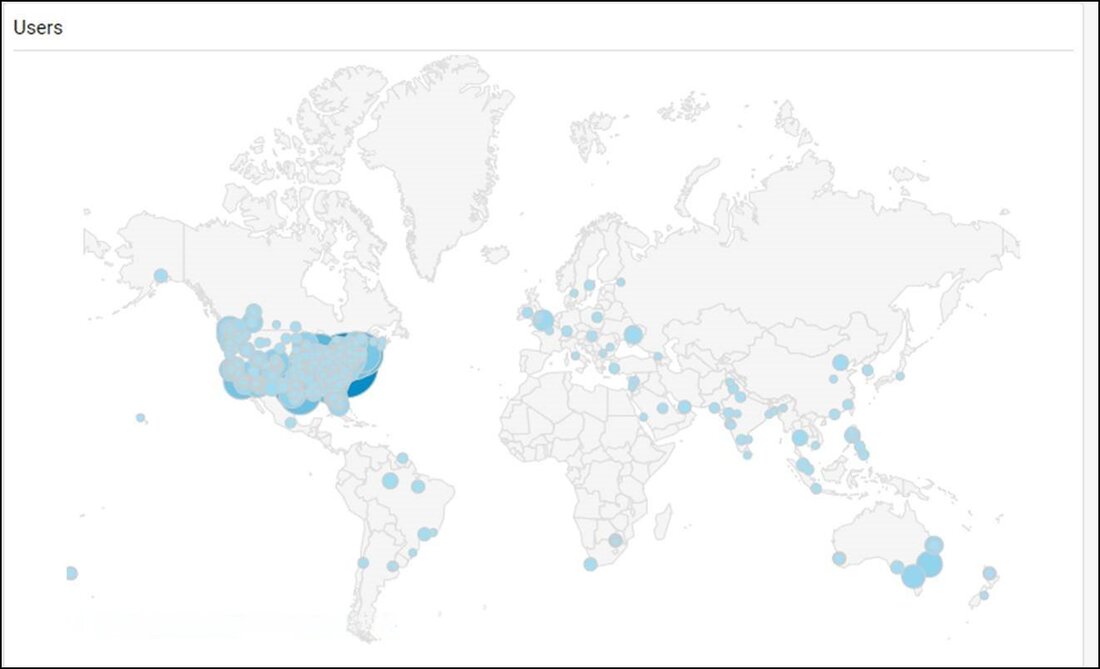
However, like all other Birchwood Casey “reactive” targets, when you hit the target the bullet makes a bright chartreuse ring that is extremely easy to see from 3 to 25 yards away (the distances we usually shoot our handguns from) and relatively easy to see from even 25 to 60 yards away (the distances that we usually shoot our carbines from). This eliminates the need to walk downrange, or use a binocular or monocular, to look at your hits, while also providing firing corrections to help you tighten your groupings. The targets even have adhesive backings so that you can easily mount them and 22 repair pasters so that you can reuse the target. You can read more about these new Birchwood Casey Shoot-N-C Handgun Trainer Targets - 12" X 18" on our Shooting/Targets page. Last Year We Had More Readers Than Ever BeforeLike most websites, ever since we launched our Hiking, Camping and Shooting (HCS) website we’ve tracked the statistics to see who our readers are, where they’re located and what they read. Since 2021 recently finished we thought that we would share some of our latest statistics from the year with all of you. In 2021 our readership increased by 32% and came from 112 different Countries from around the world. We had an increase of 10% of our readers coming from countries outside of the US, but 77% or our readers still came from the United States. The largest concentrations outside the US were from the following 20 Countries:
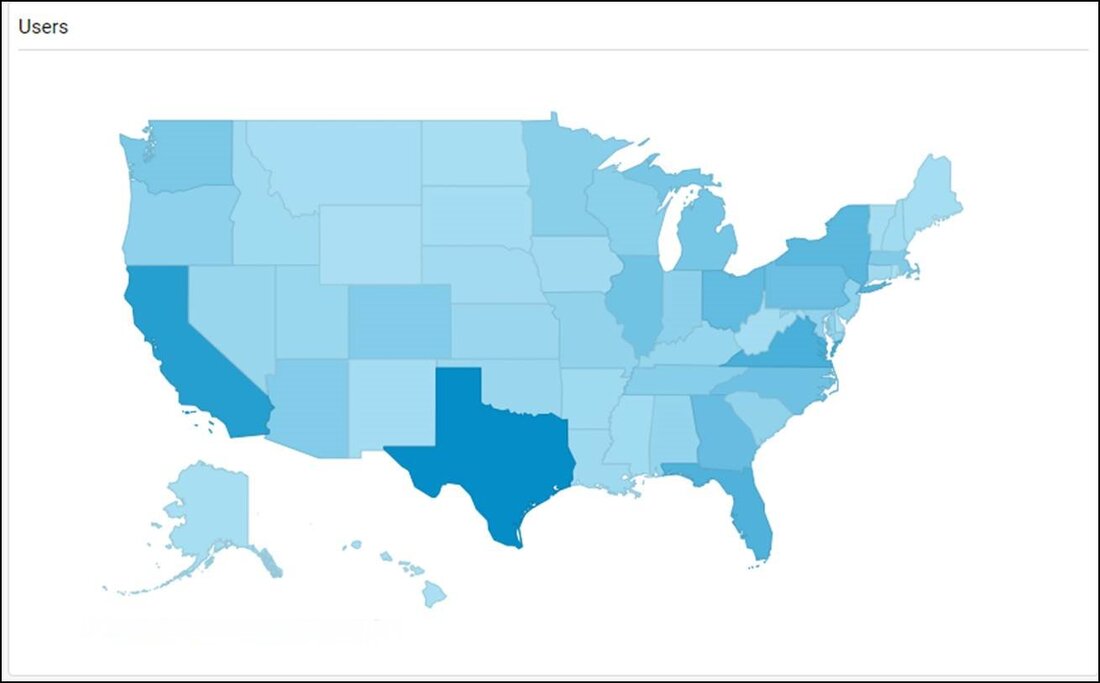
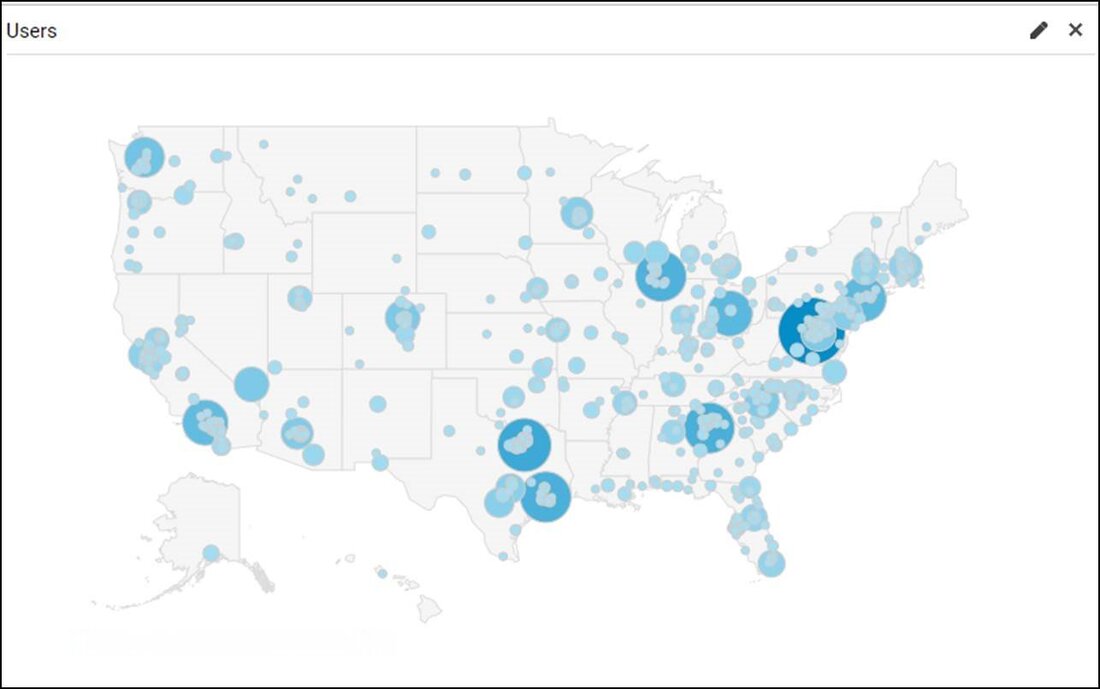
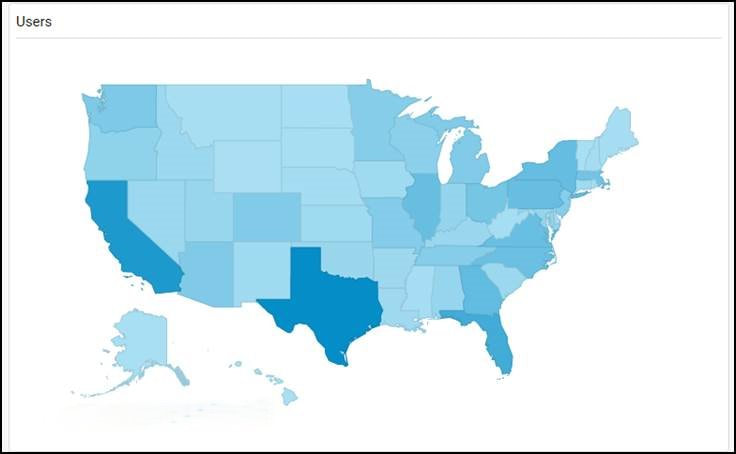
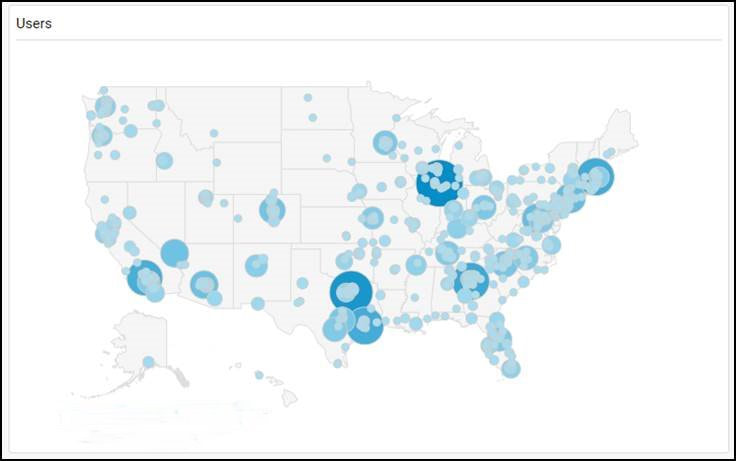
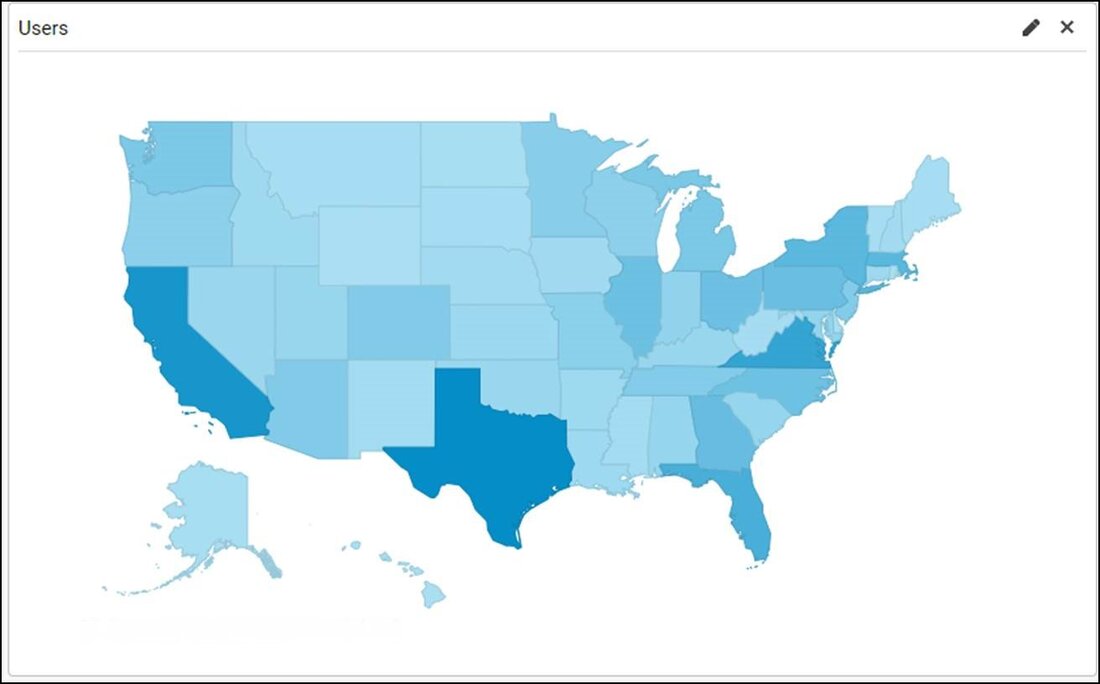
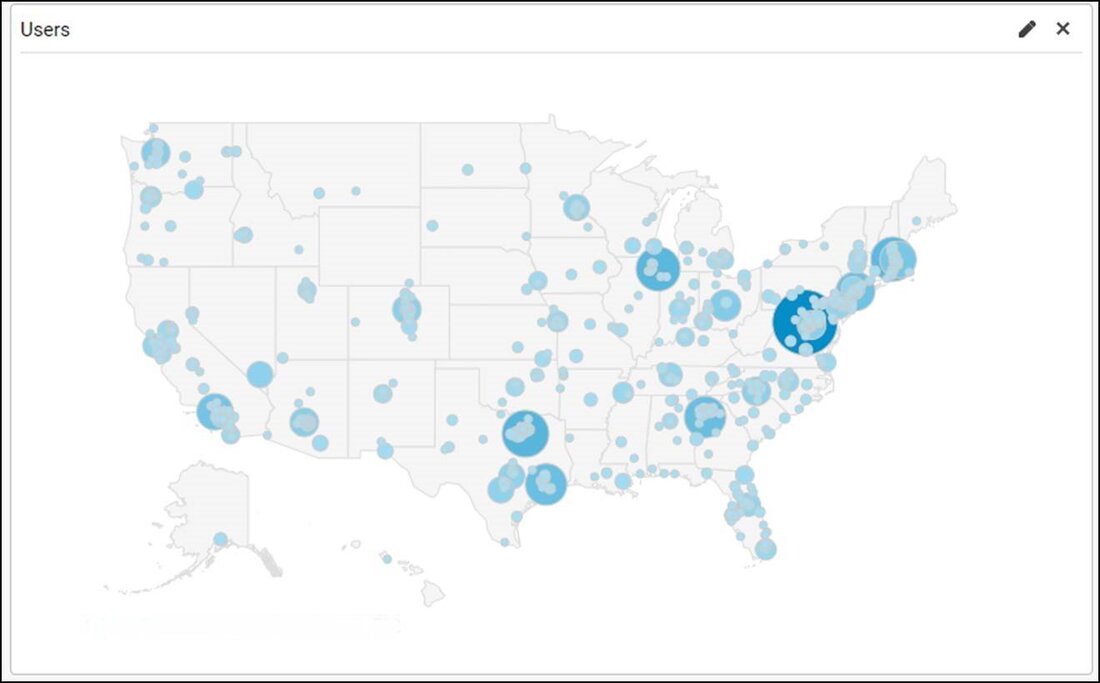
  We have readers from all 50 of the United States - with the largest concentrations being in the following 20 States:
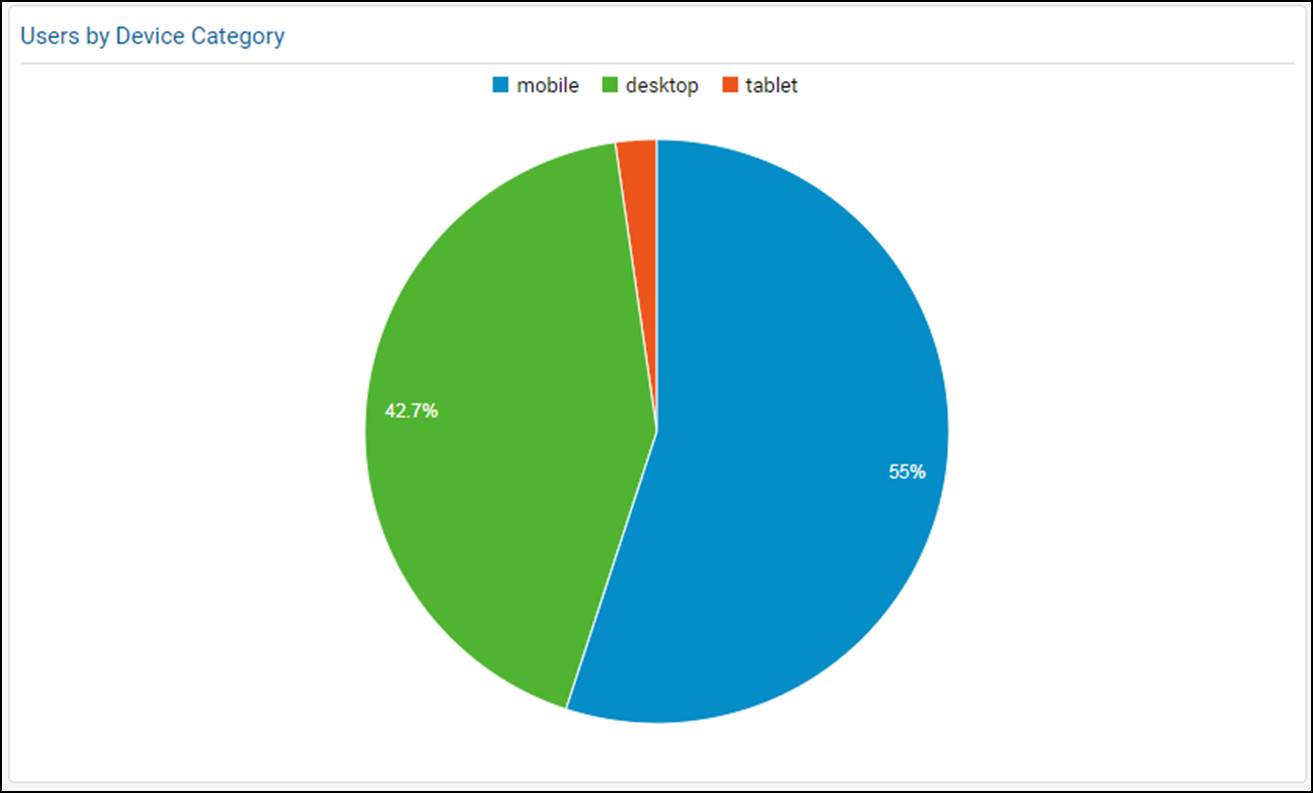
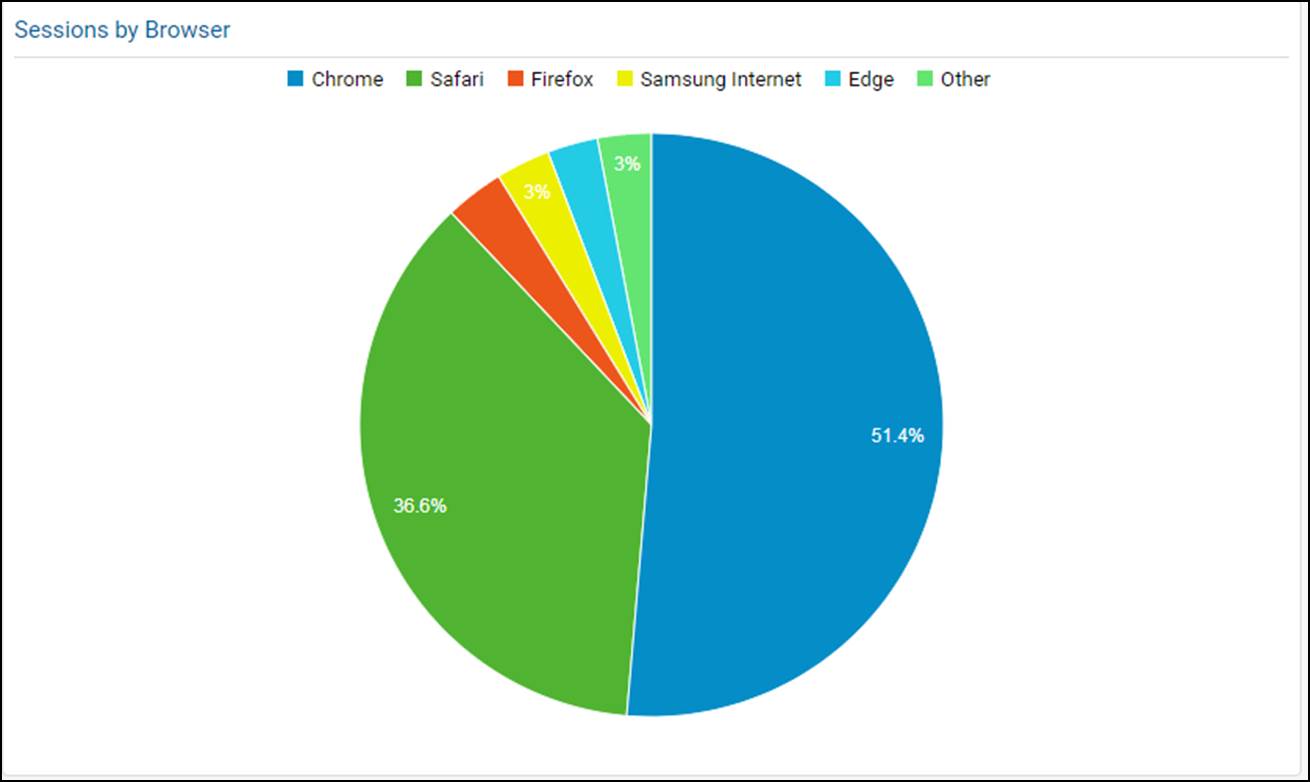
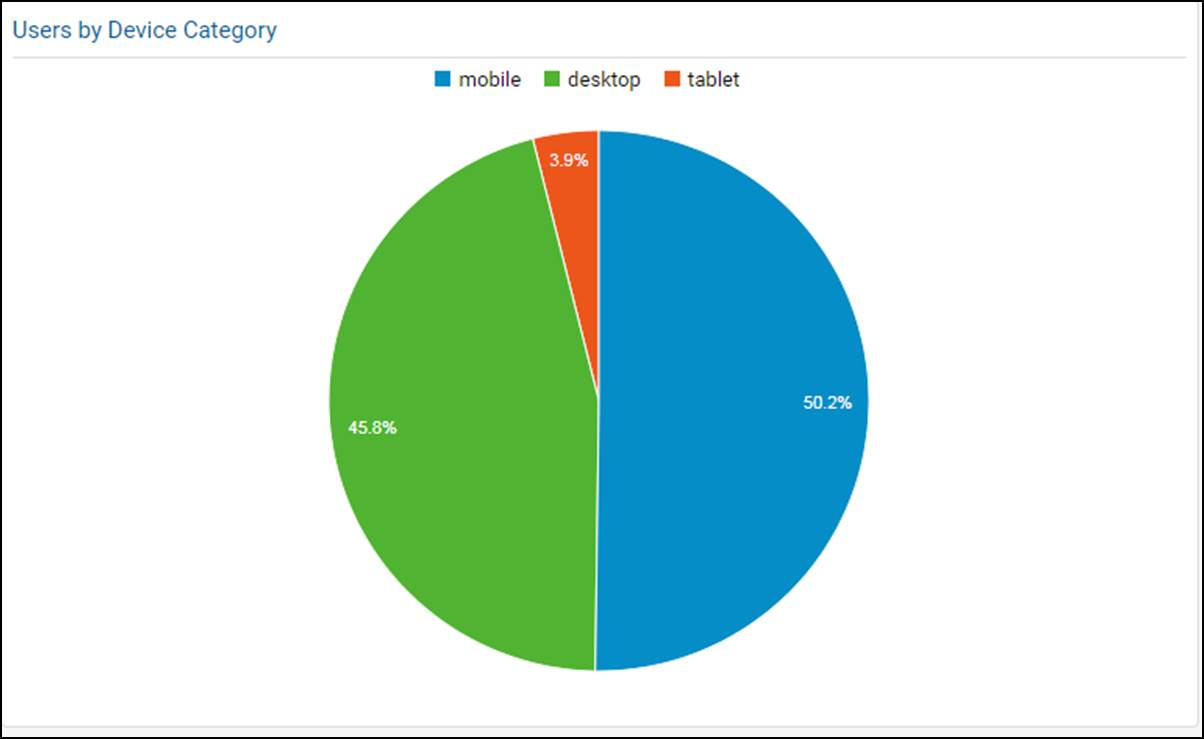
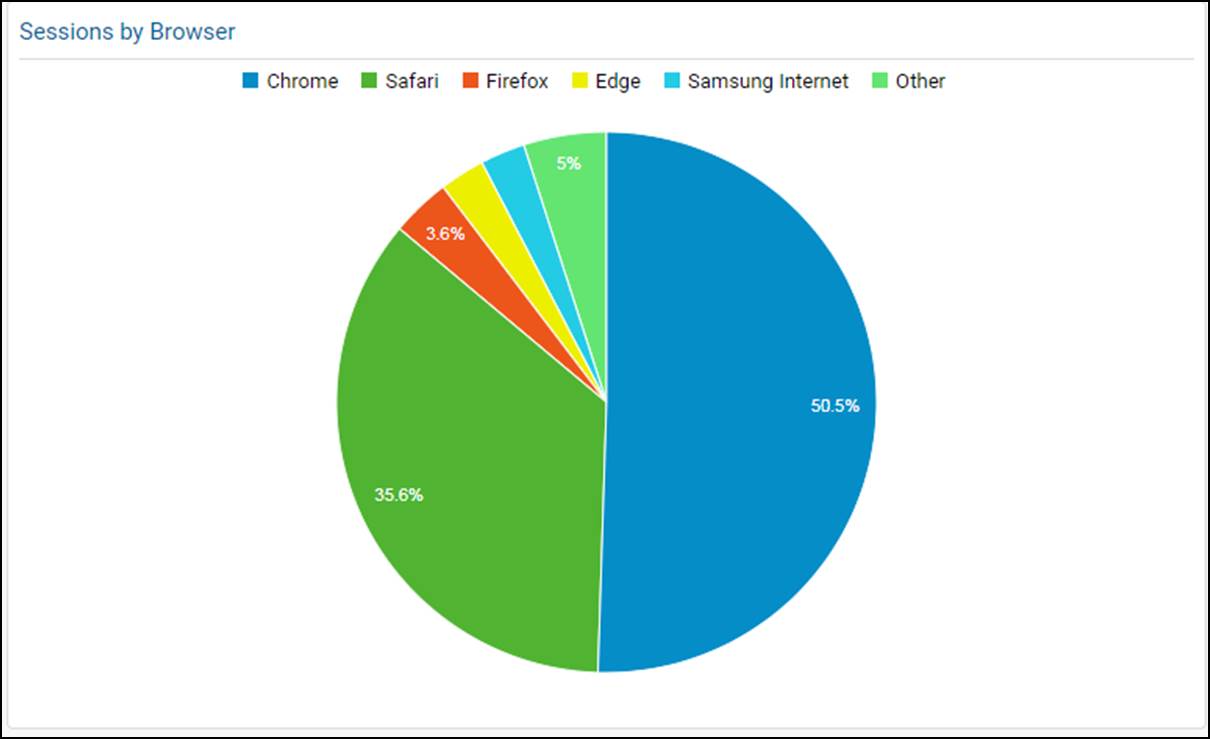
  The 35 pages and blog posts that people read the most during 2021 were: Like 2020, in 2021 we had more page views on our "Shooting" pages than either our "Hiking" or "Camping" pages. Probably because of the craziness of 2021, and the fact that approximately 38.9 million new firearms were sold in the United States during the year. The majority of our users look at our website between the hours of 10:00 AM and 1:00 AM. 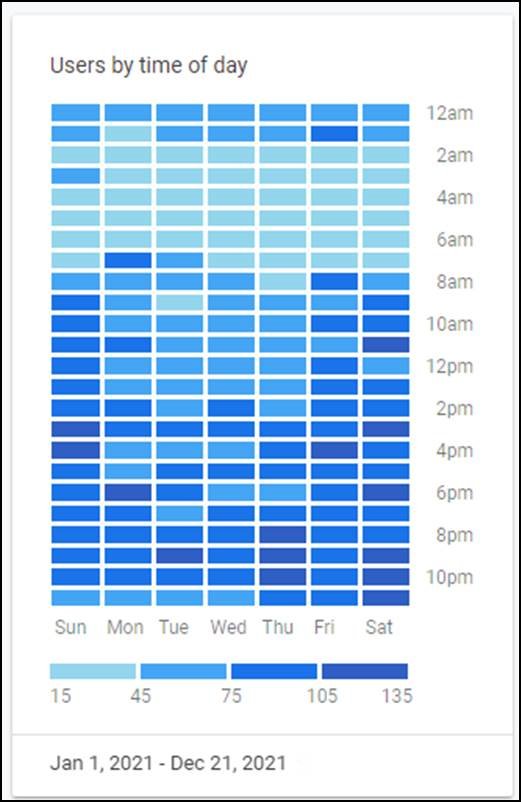 Most of our readers find us either by searching on Google (82%) or by previously having been to our website and coming directly to us (13%). A much smaller percentage (5%), find us through other sources to include our Hiking, Camping and Shooting Facebook page. 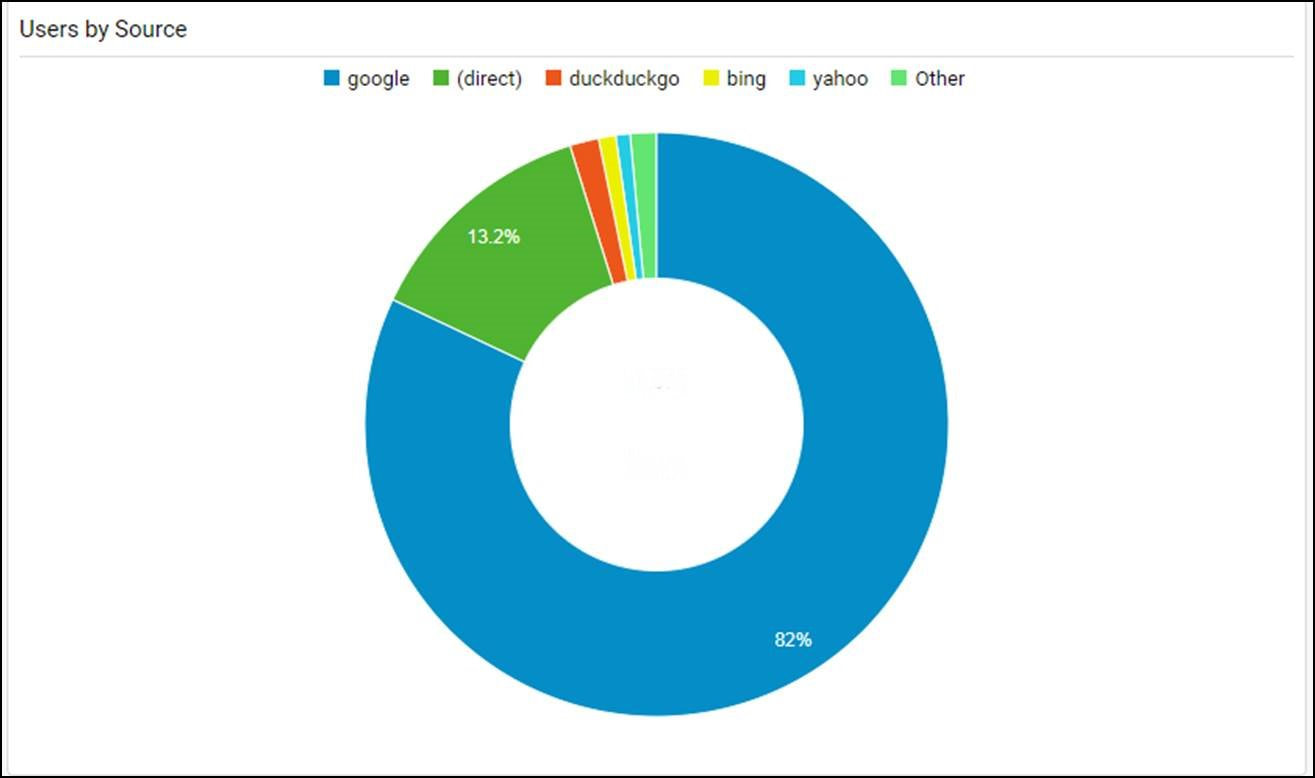 The majority of our users view our website from either their mobile device (55%) or their desktop computer (43%) using either Chrome (51%) or Safari (37%) browsers.
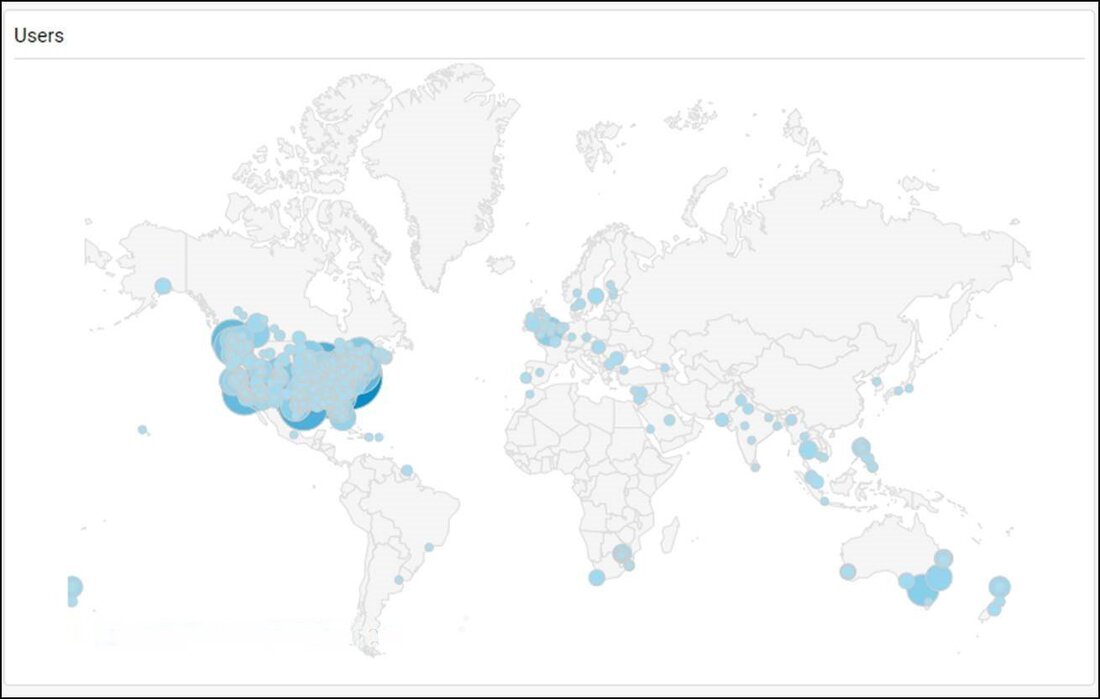
Since we launched our website back in April 2016 we've had people from 143 different countries stop by with 79% coming from the US and the other 21% from all over the World. The top 25 international countries and the top 25 US States are:
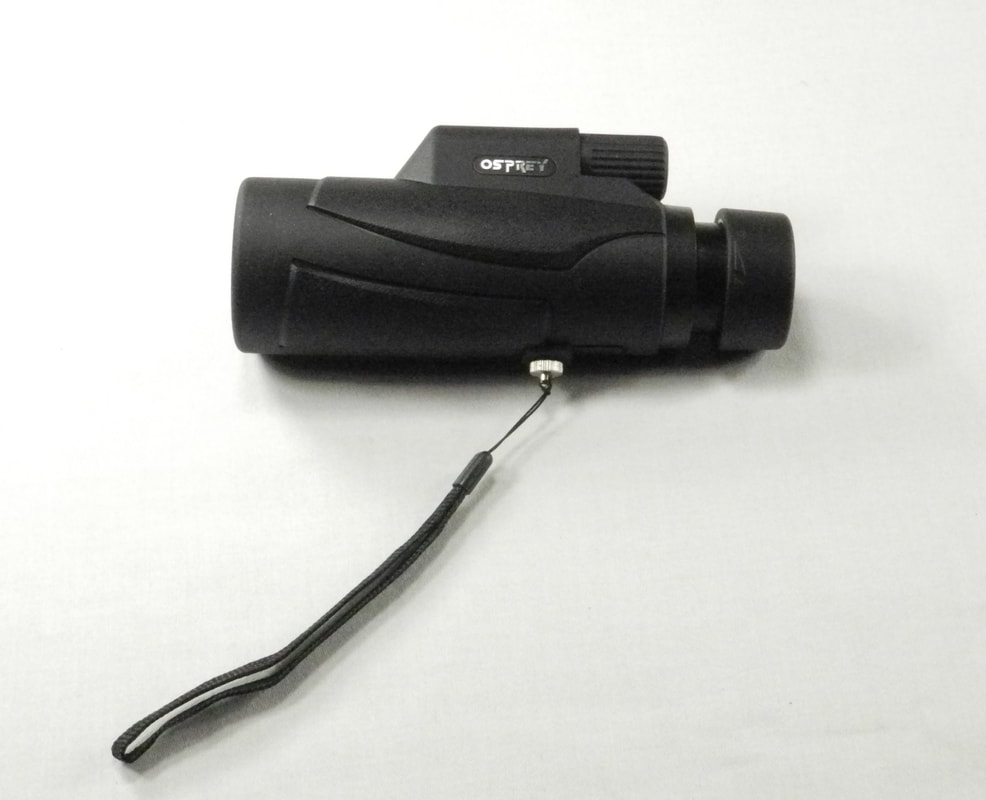
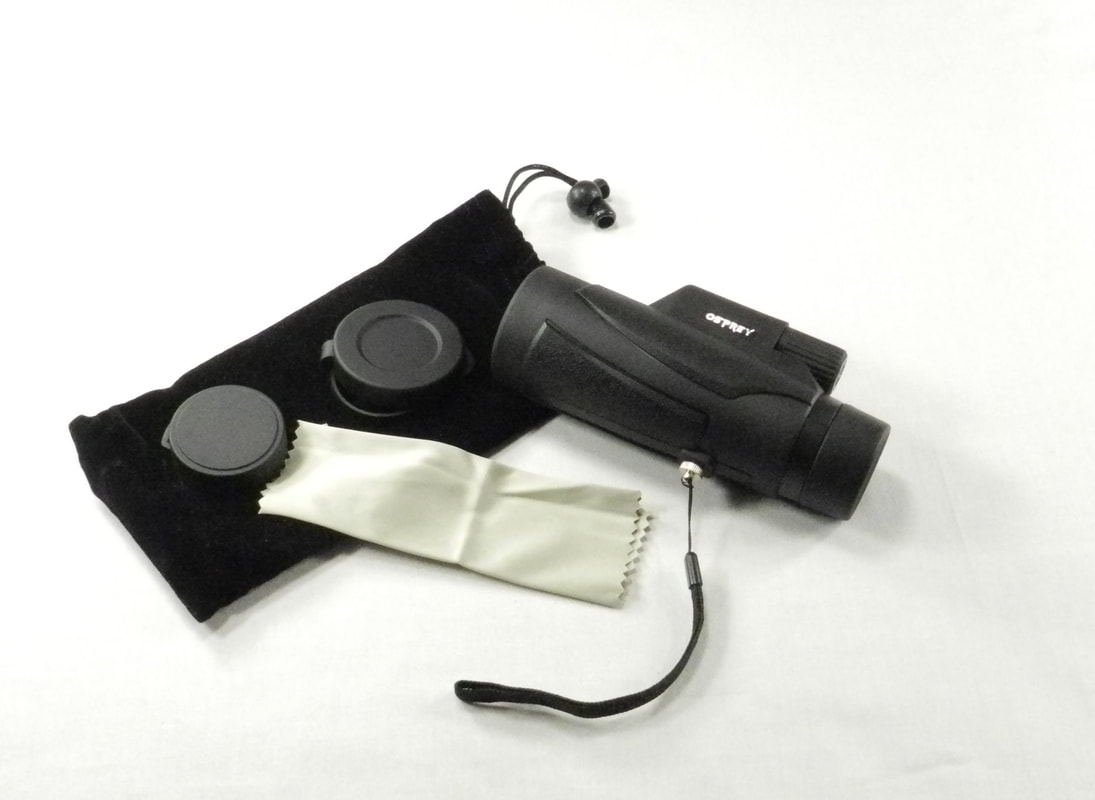
Hopefully this data shows you that in 2021 you were in good company as you read through our Hiking, Camping and Shooting gear write-ups and blog posts. We hope that they gave you some information that made all of your adventures a little more fun. Wherever you’re from, we’re glad that you stopped by to look over our HCS website and look forward to seeing you again in 2022. Osprey Global 8x42 Monocular For Christmas I received a brand new Osprey Global 8x42 monocular to help me better see the placement and groupings of the rounds that I fire at the targets downrange. Ok – I actually gave the monocular to myself for Christmas – but it’s the thought that counts. For years I’ve used a set of binoculars at the range; but to be honest two aspects have always bothered me: their weight and the amount of time it takes to properly line up the eyepieces with my eyes to get the field-of-view to accurately point at the downrange target; even after I’ve initially sighted them in and focused them on the target. Since monoculars are generally found to be best in situations where you only need to take a quick view at a distant object, and don’t need to continuously observe moving objects, I decided to give a one a shot. It’s smaller, more compact and lighter – which allows it to actually fit into my range bag. In addition, the fact that I only have to line up one eyepiece allows me to more quickly see the target and where my rounds are hitting. The Osprey Global 8x42 monocular comes with a fabric case, wrist strap, front/back lens covers and a microfiber cleaning cloth. You can read more about it on our Shooting/Range Items and Tools page.
Osprey Global In-chamber Laser Boresights (9mm, .223/5.56mm and 7.62 x 39mm)One of the biggest challenges for all shooters is sighting in their forearms. It’s a process – and if you don’t know how to systematically approach it you can get very frustrated. Luckily, over the past couple of years laser boresight devices have come a long way, in physical form, range and accuracy, to help support you in your efforts to sight in a firearm. Until recently we never bothered with laser boresights because of a variety of issues: (1) had to be bolted on and aligned prior to use, (2) too bulky, (3) not strong enough to illuminate a target either outside or beyond 20 yards, (4) insufficient accuracy and (5) poor battery life. However, because of recent technical improvements, we decided to give it a go and purchased three Osprey Global “in-chamber” laser boresights: a 9mm Red Laser Boresight, a .223 (5.56mm) Green Laser Boresight and a 7.62x39 Red Laser Boresight. Each of these boresights is constructed like a round for your firearm and is made from high quality brass to ensure reliability and durability. To use the boresights all you have to do is screw off the base (equivalent to the “rim” on an actual round), insert the batteries, screw the base back on, load the boresight into the chamber of your firearm and close the breech. (Note: Once you insert the batteries the laser will activate and project from the front of the boresight – so be careful where you point it as you load it into your firearm; and don’t insert the boresight into the chamber if the firearm is hot.) After you have the laser boresight in the firearm, point it downrange at a target and adjust your sights to align with the laser dot on the target. The laser, which has been calibrated in the cartridge, is projected down the firearm’s barrel and will get you within a couple inches of center so that you can adjust your sights as appropriate. From there you can remove the laser boresight from the chamber and proceed to make the final fine sight adjustments. The “red” lasers use three LR41H/LR41/AG3/392A Alkaline 1.5V batteries and the green laser uses six (6). There are several in-chamber boresights currently on the market and we liked both the Sightmark and Osprey Global products – but purchased the Osprey boresights since they were immediately available. The boresights are backed by a lifetime warranty. You can read more about these in-chamber laser boresights on our Shooting/Range Items and Tools page. 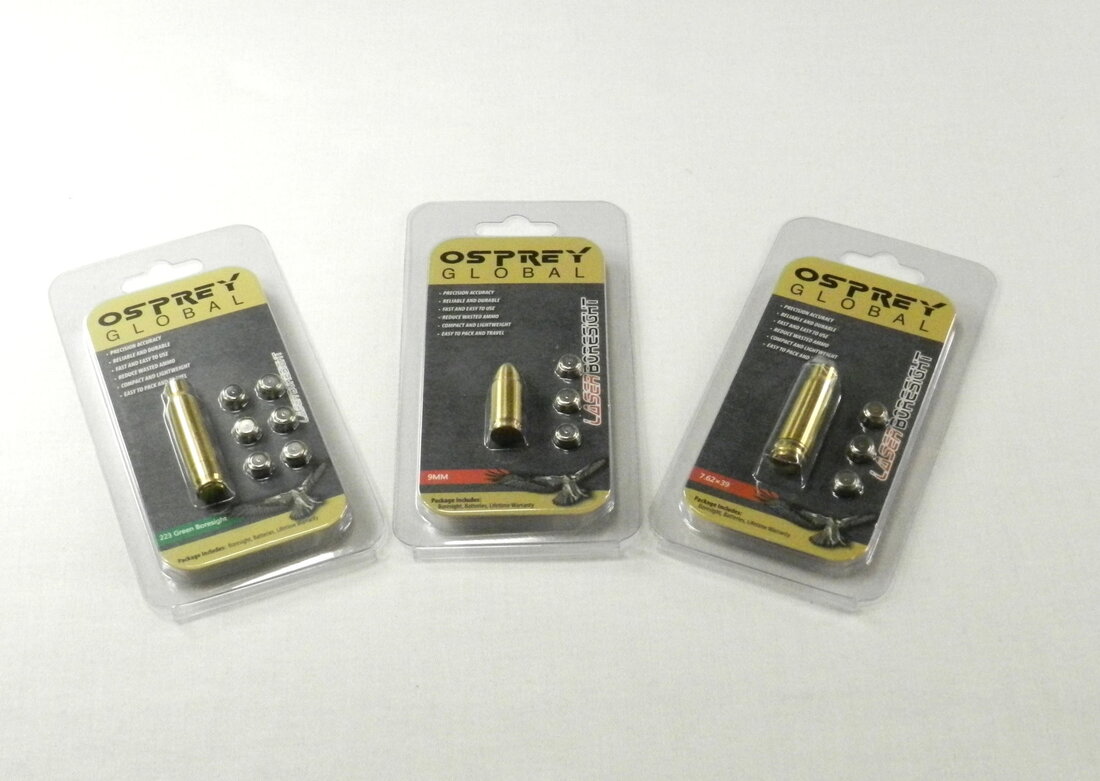 MTM Ammo Can Mini (AC15)At the range it always seems like there are odds and ends that you need near you – maybe not in your range bag – but at least in your car or truck. To keep all these small items together you need a versatile carrying case. We’ve looked for cases over the years and have used a variety of what we found in stores (e.g. tool boxes, tackle boxes, small plastic bins, etc.,), but we never loved them - since they were either too heavy or too flimsy. Recently we saw that MTM Case-Gard had come out a new “mini” sized Ammo Can; and we love MTM containers – so we tracked them down and bought a couple of them. The mini ammo can is built just like their full sized cans – but is significantly smaller with internal dimensions of 6.7"(L) x 3.4"(W) x 5.9"(H) and external dimensions of 8.4"(L) x 4.4"(W) x 6.8"(H). It will carry 12 pounds and has the same strong handle, heavy-duty latching system, water-resistant O-ring seal for dry storage and double padlock tabs for security. Although we use our mini-can for “odds and ends”, MTM says that it will hold: 700 rounds of 9mm bulk ammo. 400 rounds of 45 ACP or 223 bulk ammo, 100 rounds of boxed 28ga. or 410ga shells, or 60 rounds of 12ga. 2-3/4” shells. Like all MTM ammo cans the mini-can is designed for stacking and made of rugged polypropylene plastic. Ours are “Dark Earth” in color so that we can easily locate them – but they also come in Forest Green, Black, Orange, Red, Blue and Purple. You can read more about the MTM mini ammo can on our Shooting/Range Items and Tools page. 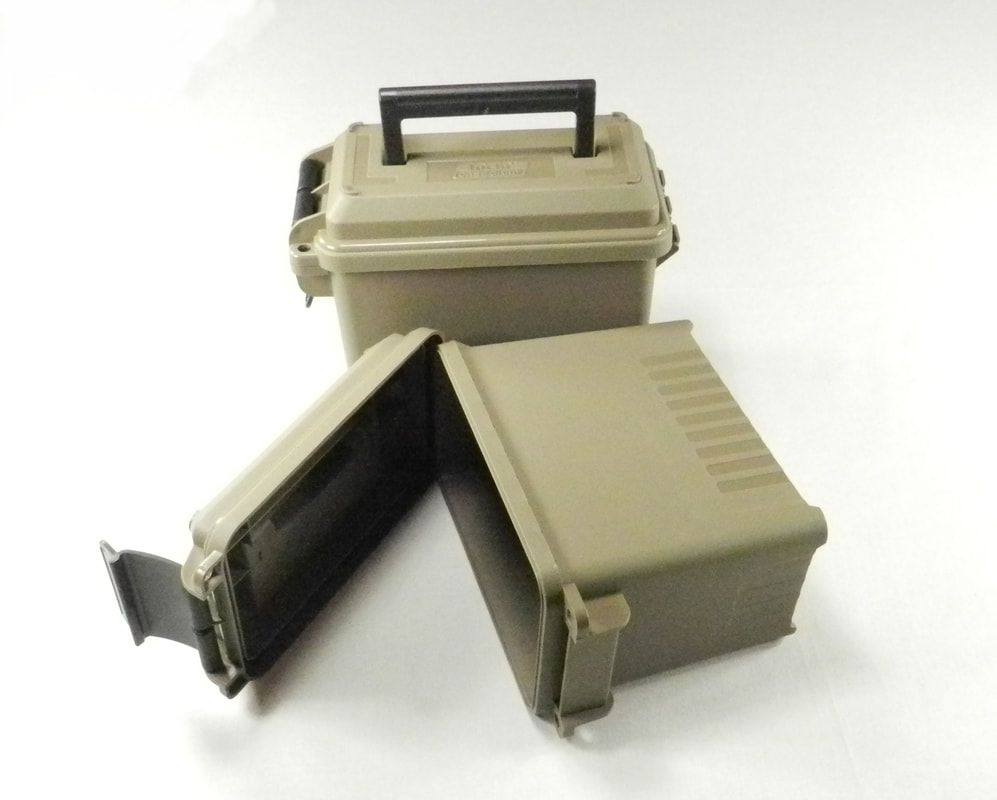 Vedder Holsters LightDraw™ Kydex OWB - S&W Shield 2.0 with Green Crimson Trace Laser When we purchased the M&P Shield 2.0 with an integrated Green Crimson Trace laser two years ago we also wanted to get a new OWB holster since the laser changes the form of the handgun. Unfortunately, although we could find a IWB holster, we couldn't find an OWB holster that fit the hand gun and met our standards for usability/comfort. So, because we had three other Vedder Holsters, every once in a while we checked to see if Vedder was producing the OWB holster that we were looking for. Recently they finally began to produce just such a holster. You can read more about this OWB holster on our Shooting/Holsters page. 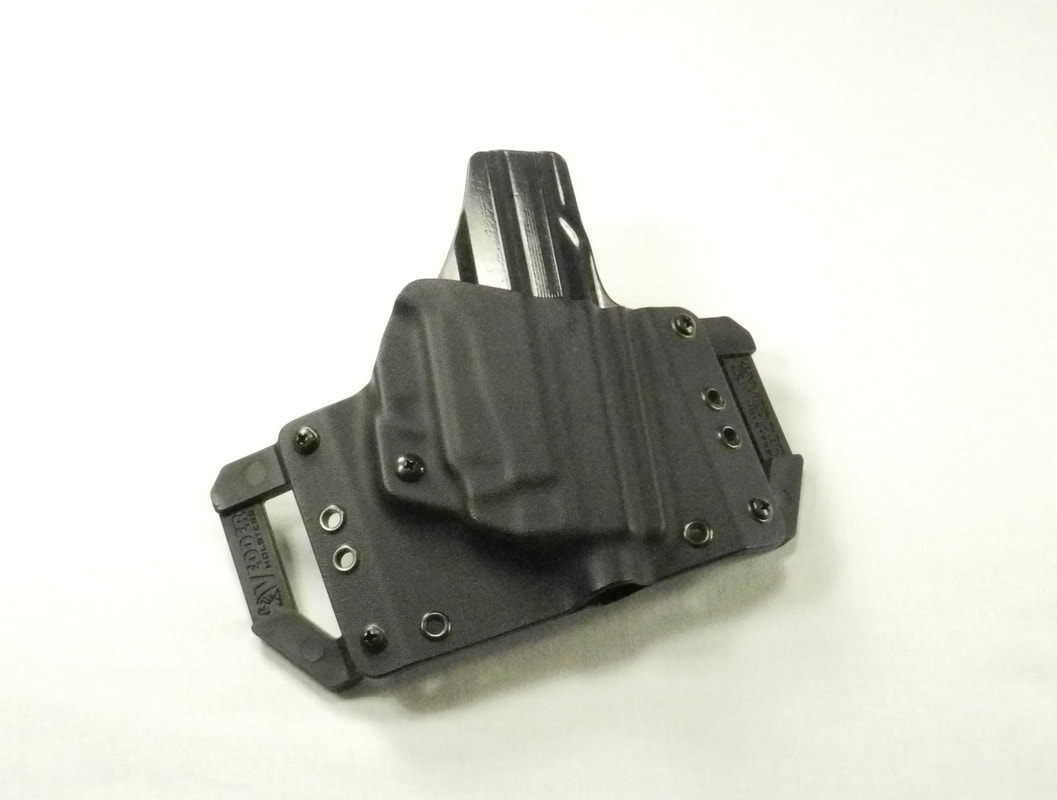 5.11 Tactical Men's Military Trainer Belt Earlier this week we were at the outdoors range (yea – the Spring weather is finally here in New England) and got into a discussion about the best belts to support your holster and tactical activities. So, although we don’t normally spend much time discussing the clothes you need for Hiking, Camping and Shooting since they vary too much by local environment, since belts are a little different – we added some information about the belts that we’ve been using for the past 4 years (after trying lots of other belts through the years) to the Shooting/Holsters page. If you need a good belt for your holster, and other EDC gear, you should take a look. 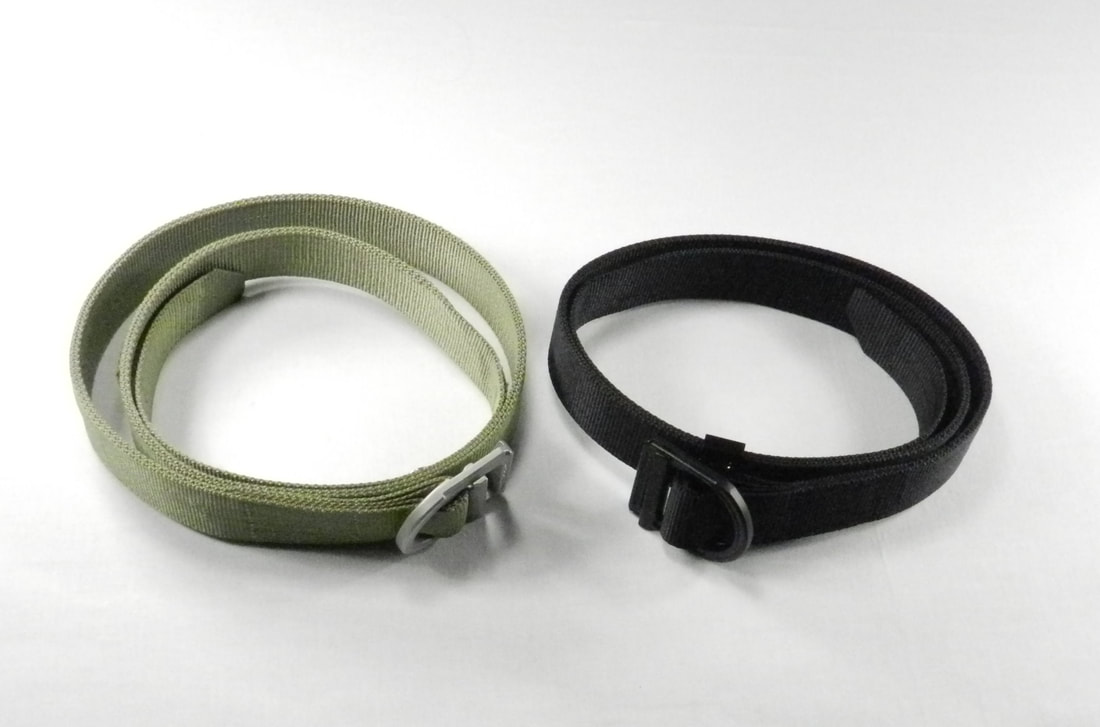 We Have Readers from All Over the World Like most websites, ever since we launched our Hiking, Camping and Shooting (HCS) website we’ve tracked the statistics to see who our readers are, where they’re located and what they read. Since 2020 just finished we thought that we would share some of our statistics from the year with all of you. In 2020 we had readers from 81 different Countries from around the world, with 87% or our readers coming from the United States, and the largest concentrations outside the US being from the following 20 Countries:
  In fact we've now had people from 126 different countries view our website over the past 3 years (2018, 2019 and 2020).  We have readers from all 50 of the United States - with the largest concentrations being in the following 15 States:
  The 25 pages and blog posts that people read the most during 2020 were: Unlike the previous two years, in 2020 we had far more page views on our "Shooting" pages than either our "Hiking" or "Camping" pages. Probably because of the craziness of 2020 and the fact that approximately 40 million new firearms were sold during the year. The majority of our users look at our website between the hours of 9:00 AM and 12:00 AM (midnight). 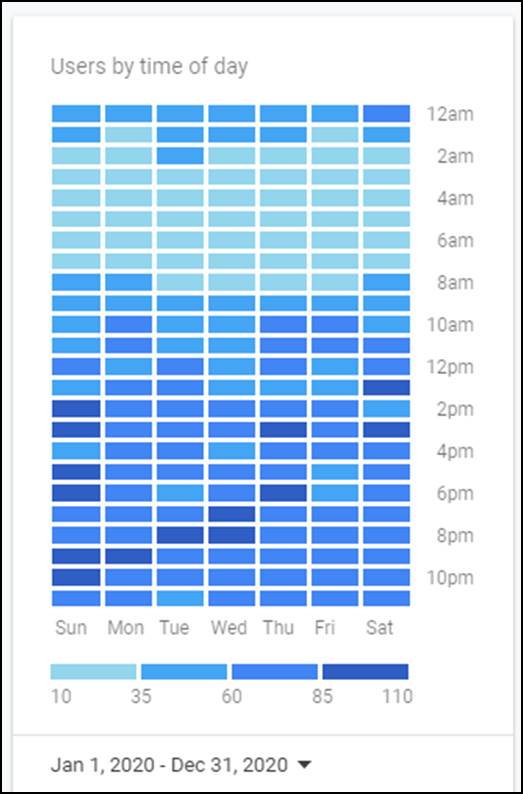 Most of our readers find us either by searching on Google (82%) or by previously having been to our website and coming directly to us (10%). A much smaller percentage (5%) find us through our Hiking, Camping and Shooting Facebook page. 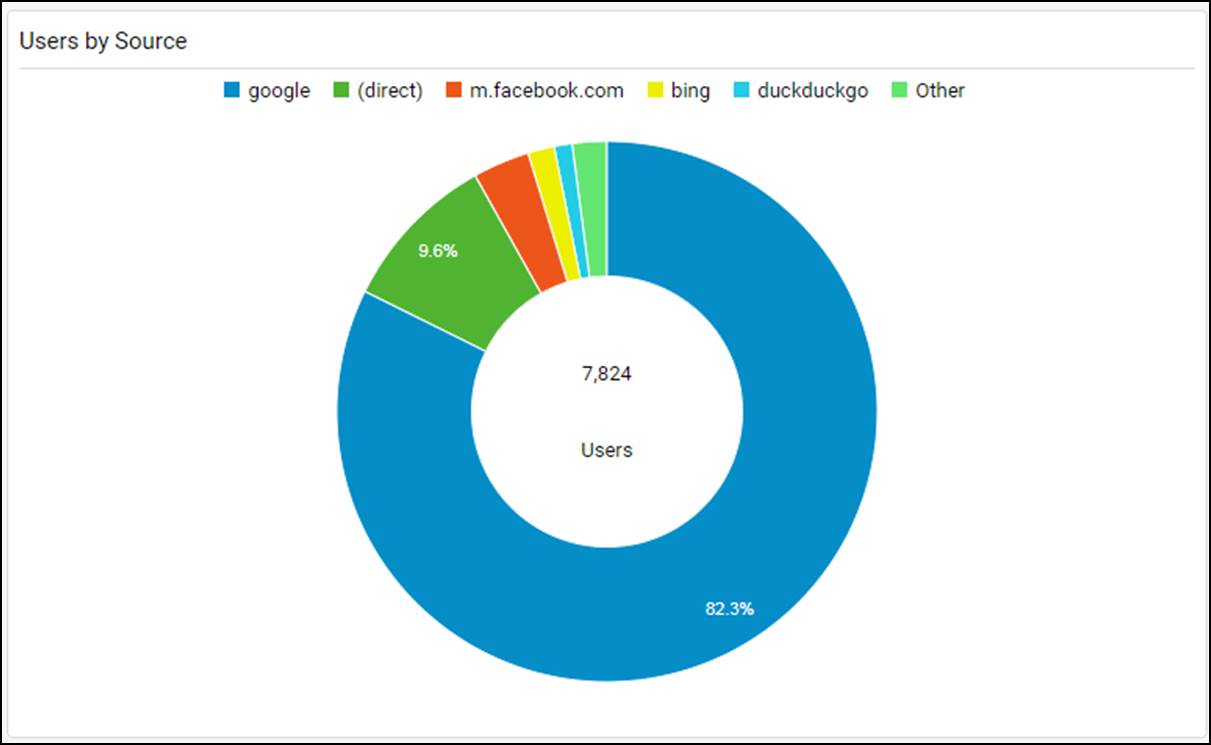 The majority of our users view our website from either their mobile device (50%) or their desktop computer (46%) using either Chrome (51%) or Safari (36%) browsers.
Hopefully this data shows you that in 2020 you were in good company as you read through our Hiking, Camping and Shooting gear write-ups and blog posts. Our wish is that they gave you some information that made all of your adventures a little more fun. Wherever you’re from, we’re glad that you stopped by to look over our HCS website and look forward to seeing you again in 2021. NICS Firearm Sales Numbers for December 2020This week the FBI released the numbers for firearms sold in December 2020. During the month there were 3,937,066 sales, making it the highest month of 2020 and the highest month on record for background checks since the FBI began keeping statistics in 1998. In the process breaking the previous December record of 3,314,594 checks, set in December 2015, and the previous all-time high of 3,931,607 set in June 2020. This made the total number of firearms sold in 2020 equal to 39,695,315 - just shy of 40 million. 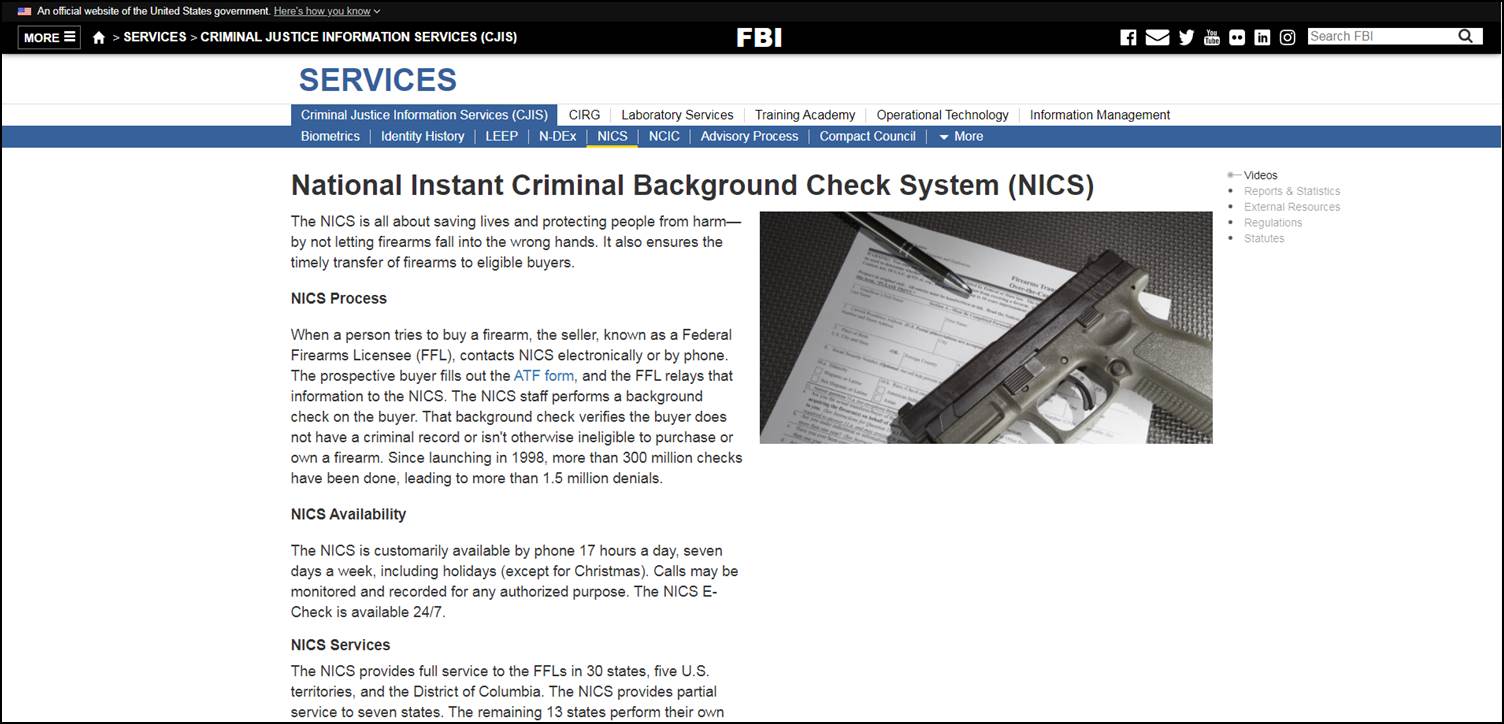 In actuality there were probably even more firearms sold since anybody who has a concealed carry permit has already passed a NICS background check, so in many states when they purchase a new firearm a NICS check does not have to be run again. In addition, in most states a NICS check is not required for private firearm sales between two individuals. And finally, a single NICS check allows a person to buy multiple guns during the same transaction. The background check numbers would have probably been even higher, if the "in stock" inventory at most gun stores had been fuller. It's also estimated that more than 8.4 million people legally purchased a firearm for the first time in 2020. Clearly people want to defend themselves and after the craziness of 2020 have doubts about the Government and Police doing it for them. You can see all the details, and statistics since 1998, on the FBI’s National Instant Criminal Background Check System (NICS) website at: https://www.fbi.gov/services/cjis/nics |
What's On This Page?Here's where we post reviews, questions, answers, thoughts and other information that's of general interest to our followers in a blog format. Categories
All
Archives
August 2023
|

 RSS Feed