Hiking, Camping and Shooting
  • Home
  • Hiking
    • Footwear
    • Headgear
    • Navigation
    • Hydration
    • Food
    • Photography
    • Raingear
    • First Aid
    • Emergency Supplies
    • Day Pack
  • Camping
    • Shelter
    • Sleeping
    • Hydration
    • Cooking
    • Tools
    • Light
    • Electronics
    • First Aid
    • Maps and Books
    • Organization and Storage
    • Disaster Preparedness
  • Shooting
    • Handguns
    • Carbines
    • Rifles
    • Shotguns
    • Magazines
    • Optics and Mounts
    • Shrouds and Accessories
    • Slings
    • Holsters
    • Loaders
    • Carrying Cases
    • Safety Items
    • Range Items and Tools
    • Targets
    • Ammunition
    • Cleaning Supplies
    • Gun and Ammo Storage
  • Adventures
    • North America
    • Europe
    • Oceania
    • Asia
    • South and Central America
    • Middle East
  • Blog
  • About
  • Contact

Your 2nd Amendment Legal Rights

3/30/2023

0 Comments


You Must Know How to Exercise Your Rights Within the Law

​These days there is an ongoing high-profile fight to redefine and change the rights of the people of the United States to have, hold and use firearms. The discussion is constant and many times the truth gets lost in the hyperbole as the media skews the truth to fit their agendas. But one thing is clear, if you own a firearm, and especially if you carry it or use it for self-protection, you need to know and understand your legal rights and your local laws.
Picture
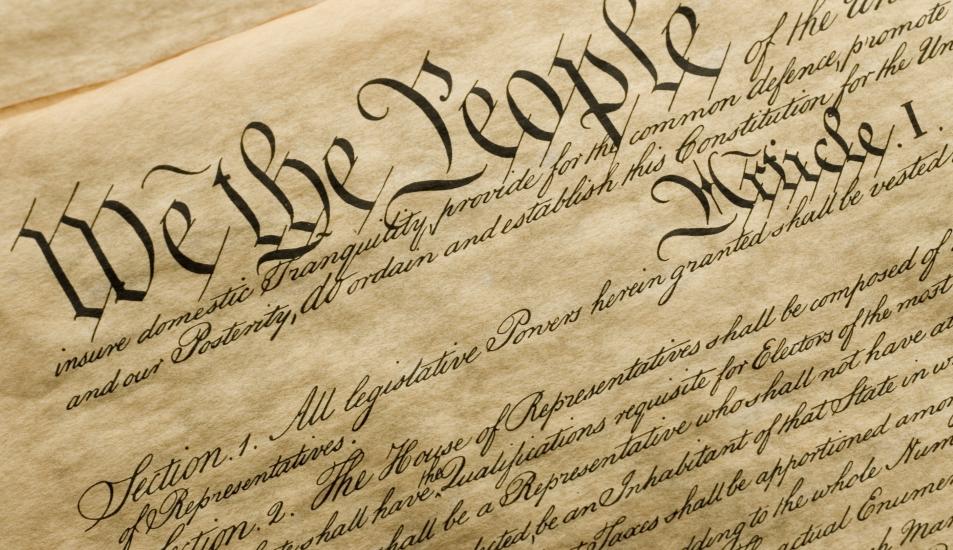
We all learned about the US Constitution in school. The Constitutional Convention assembled in Philadelphia in May of 1787. On 17 September 1787, after 3 months of discussions, arguments and deliberations, 38 delegates (plus George Reed who signed for John Dickinson of Delaware, who was absent) signed the Constitution. Here’s a good summary about what the purpose of the Constitution was and what it accomplished:
“The Constitution acted like a colossal merger, uniting a group of states with different interests, laws, and cultures. Under America’s first national government, the Articles of Confederation, the states acted together only for specific purposes. The Constitution united its citizens as members of a whole, vesting the power of the union in the people. Without it, the American Experiment might have ended as quickly as it had begun.
Picture
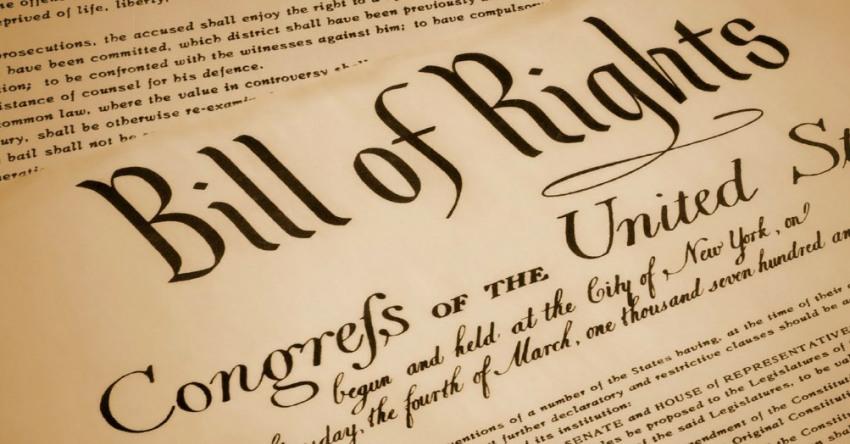
​But the Constitution might never have been ratified if the framers hadn't promised to add a Bill of Rights. The first ten amendments to the Constitution gave citizens more confidence in the new government and contain many of today's Americans' most valued freedoms.
Preamble to the Bill of Rights – “The Conventions of a number of the States, having at the time of their adopting the Constitution, expressed a desire, in order to prevent misconstruction or abuse of its powers, that further declaratory and restrictive clauses should be added: And as extending the ground of public confidence in the Government, will best ensure the beneficent ends of its institution.
“On September 25, 1789, the First Congress of the United States proposed 12 amendments to the Constitution. Ten of the proposed 12 amendments were ratified by three-fourths of the state legislatures on December 15, 1791. The ratified Articles (Articles 3–12) constitute the first 10 amendments of the Constitution, or the U.S. Bill of Rights. In 1992, 203 years after it was proposed, Article 2 was ratified as the 27th Amendment to the Constitution. Article 1 was never ratified.”
 
The Bill of Rights enumerates the birthrights of every American. These are not rights granted to the people by the US Government, these are rights that the US Government was formed to protect. Furthermore, these rights are the rights that each individual has. They are not rights bestowed on the people by membership in a group; they are specifically individual rights. One of these rights is the right to own and bear arms as delineated in the 2nd Amendment.  The right to bear arms was to specifically added to ensure that a citizen had the ability to secure their other enumerated rights. 
Picture
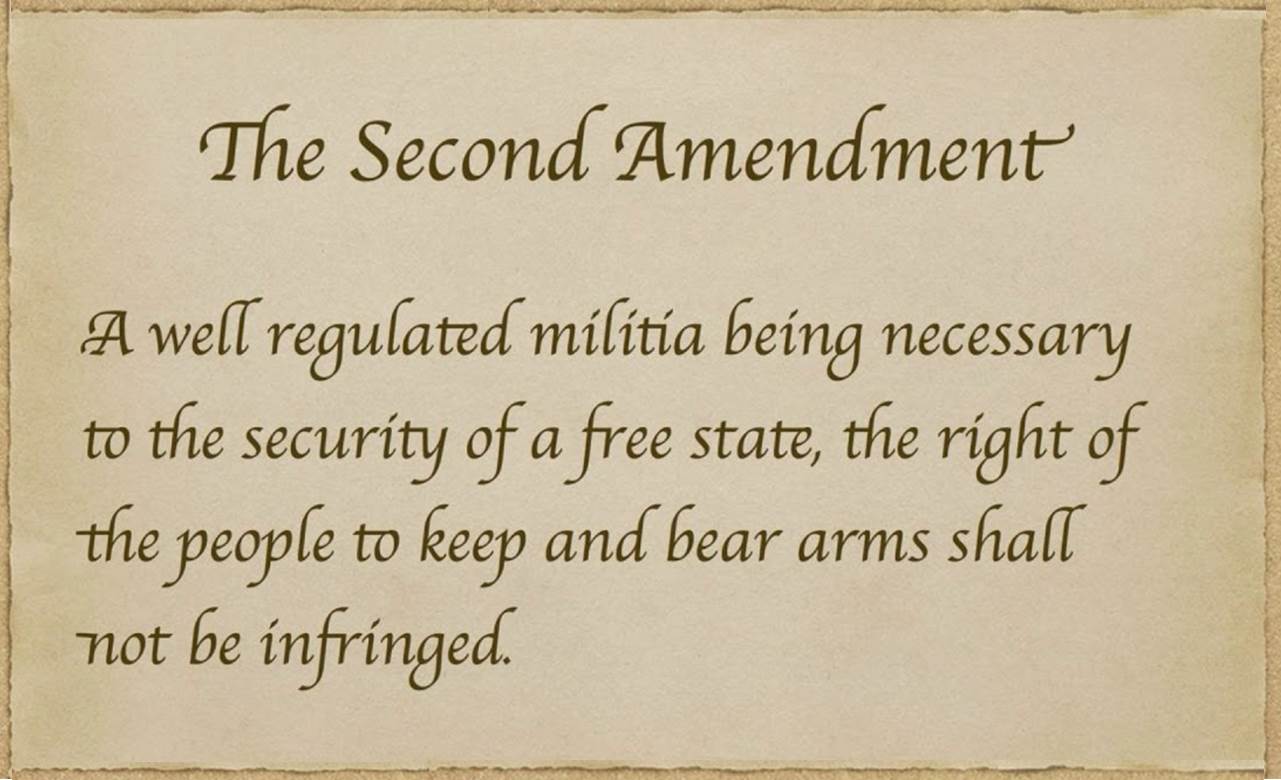
Here’s a really good short article on what we believe the 2nd Amendment to the US Constitution means.
 
Second Amendment to the United States Constitution
https://www.historyonthenet.com/second-amendment-to-the-united-states-constitution
​
Given today’s environment, whatever you do, know your rights, know your State’s laws, know the rules of gun safety - and if you get into a situation that requires legal support do not talk to the police – get a lawyer that knows how to support your 2nd Amendment rights - and then move forward with the legal system. If you don’t follow this one piece of simple advice you may regret your actions for the rest of your life. You are responsible for your actions, so plan and act accordingly.
 
If you do need legal assistance related to your Gun Rights what should you do?  Recently Timothy from the O’Mara Law Group in Orlando/Lakeland Florida sent us an email discussing their “2nd Amendment Rights Guide” that contains a lot of great information about what to do. We liked their overall position on the issue:
“It is an American's right to own a gun. We believe in preserving this lawful right for responsible gun owners, but also protecting individuals who may have been forced to discharge their weapon to protect themselves or their family. There are situations where people who have fired a gun in self-defense face criminal convictions. That's why it's important to have the proper representation and knowledge in these cases.
Picture
Here’s a brief summary of some of the key points from the O’Mara Law Group’s 2A guide:
 
  • “The Second Amendment protects an individual’s right to bear and use arms in lawful situations. However, you can still face criminal charges if you discharge a weapon, even in self-defense. Our Second Amendment lawyers can help you assert your rights and protect your future from the devastating consequences of a conviction.”
 
  • “The Second Amendment to the United States Constitution preserves the right for individuals to “ keep and bear Arms” without infringement. While some statutory limitations exist, it is critical to preserve the right to lawful gun ownership and to protect individuals who are charged with a crime in violation of their civil rights.”
 
  • If you have discharged your weapon in self-defense or been prosecuted for lawfully owning a firearm, the Second Amendment lawyers can help you fight back.
 
  • “The Supreme Court of the United States has weighed in, providing that the Second Amendment plainly “protects an individual right to possess a firearm unconnected with services in a militia, and to use that arm for traditionally lawful purposes.” The Supreme Court has also held that cities and states cannot pass laws to infringe on an individual’s right to bear arms.”
 
  • “The Second Amendment right to bear arms does not mean that anyone can have any weapon and discharge it anytime they want. Gun ownership and use have limits — including age requirements, background checks, permit requirements, and restrictions on the types of firearms that can be sold.”
 
  • “The Second Amendment protects your right to keep and bear arms for lawful uses, including self-defense. The Supreme Court mentioned self-defense explicitly in its 2008 decision in District of Columbia vs. Heller.”
 
  • “If you claim self-defense ………, you will have the burden of proving that you acted to protect yourself or others from imminent harm. If you don’t prove your case, you could be convicted of a crime for asserting your Second Amendment rights.”
 
  • In many States “……self-defense is permitted when it is reasonably necessary to prevent imminent bodily harm.”
 
  • “The consequences of an arrest, criminal charge, or conviction can be devastating. That is particularly true when the crime involves the lawful exercise of your Second Amendment rights.”
 
  • You “absolutely…..need a criminal defense lawyer if” you “acted in self-defense”.
 
If you have questions, or need their legal assistance you can contact the O’Mara Law Group at:    https://www.omaralawgroup.com/contact/
If you want to know more, we’ve previously covered several aspects of this issue in some of our previous blogs related to new gun ownership:
 
Back to Basics - What Beginners Need to Know About Handguns (2 Jan 2021)
 
4 Rules for Handling a Firearm - How to Keep Yourself, and Those Around You, Safe (27 March 2020)
 
The Unprecedented Surge in US Gun Sales During The Covid-19 Pandemic (3 June 2020)
​In addition, our main Shooting page lists several resources to assist you in navigating these treacherous waters to include:

  • Legal Information
    • Handgunlaw.us
    • NRA-ILA Guide To The Interstate Transportation Of Firearms
    • National Association For Gun Rights (NAGR)
    • USA Carry - Concealed Carry Resources
    • USA Carry - Concealed Maps
 
  • 2nd Amendment Rights Organizations
    • National Rifle Association (NRA)
    • Gun Owners of America (GOA)
    • US Concealed Carry Association (USCCA)
    • Gun Owners' Action League (GOAL)
    • Commonwealth Second Amendment (Comm2A) 

​Finally, here’s a good app that you might want to have on your phone to help keep track of all the various laws and regulations from each of the 50 US States:
 
CCW – Concealed Carry 50 State
iOS - https://apps.apple.com/us/app/ccw-concealed-carry-50-state/id443321291
Android - https://play.google.com/store/apps/details?id=ryan.ccw&hl=en

​If you want to read the details of the actual United States Constitution and Bill of Rights here are the links to the National Archives website:
 
America's Founding Documents
https://www.archives.gov/founding-docs
 
The Constitution of the United States: A Transcription
https://www.archives.gov/founding-docs/constitution-transcript
 
The Bill of Rights: A Transcription
https://www.archives.gov/founding-docs/bill-of-rights-transcript
For the sake of clarity, just so there is no doubt, as stated in our Legal Disclaimer:
“….. none of the authors of this website are licensed attorneys. Any information contained in this website on legal issues SHOULD NOT BE CONSTRUED TO BE LEGAL ADVICE. The opinions expressed are informed opinions based on the authors’ experience with and understanding of the appropriate statutes. It is NOT GUARANTEED to be CORRECT, COMPLETE or UP-TO-DATE. You should NOT act or rely on any information on this website or in an email from an author of this website without seeking the advice of an attorney that YOU have retained.”
Picture
0 Comments

What Gear Do You Really Need to Survive in the Outback?

2/25/2023

0 Comments


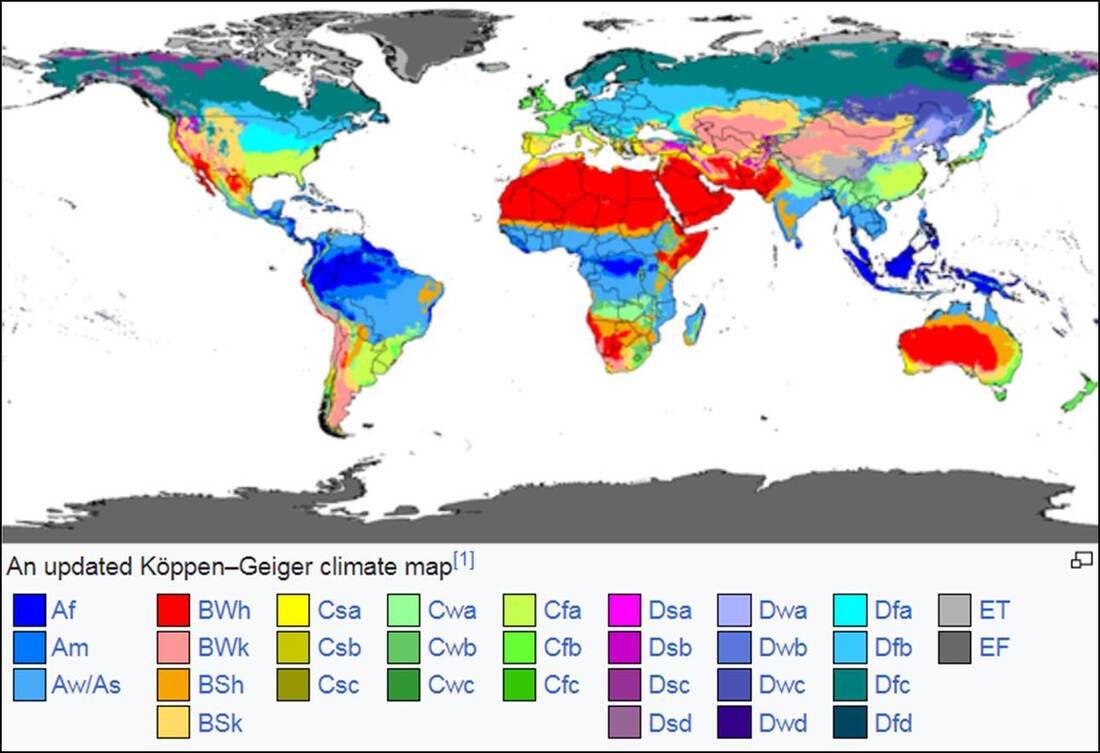
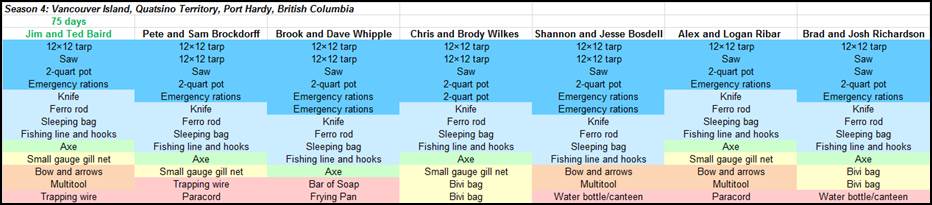
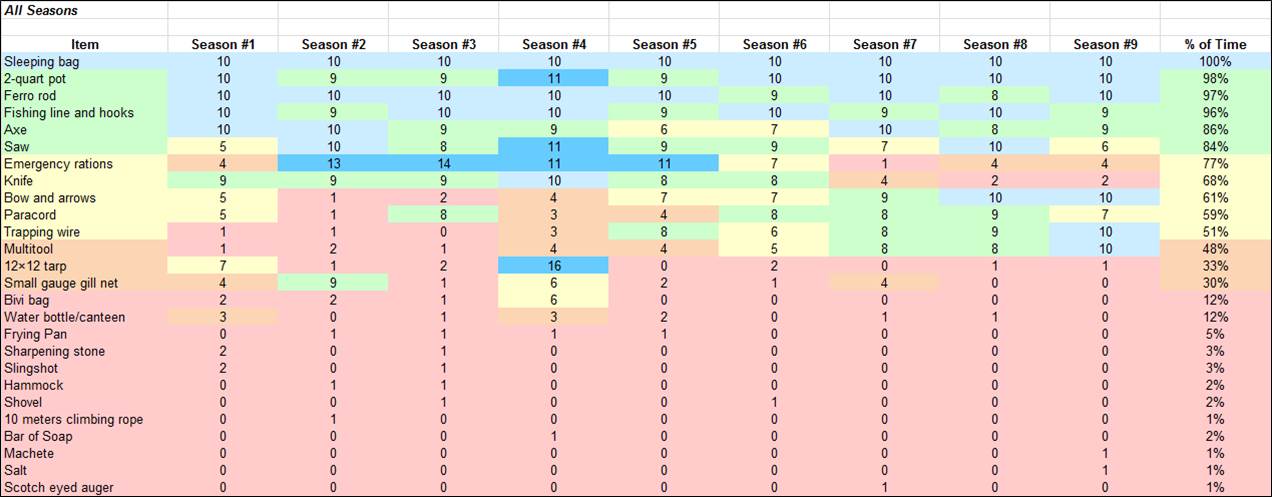
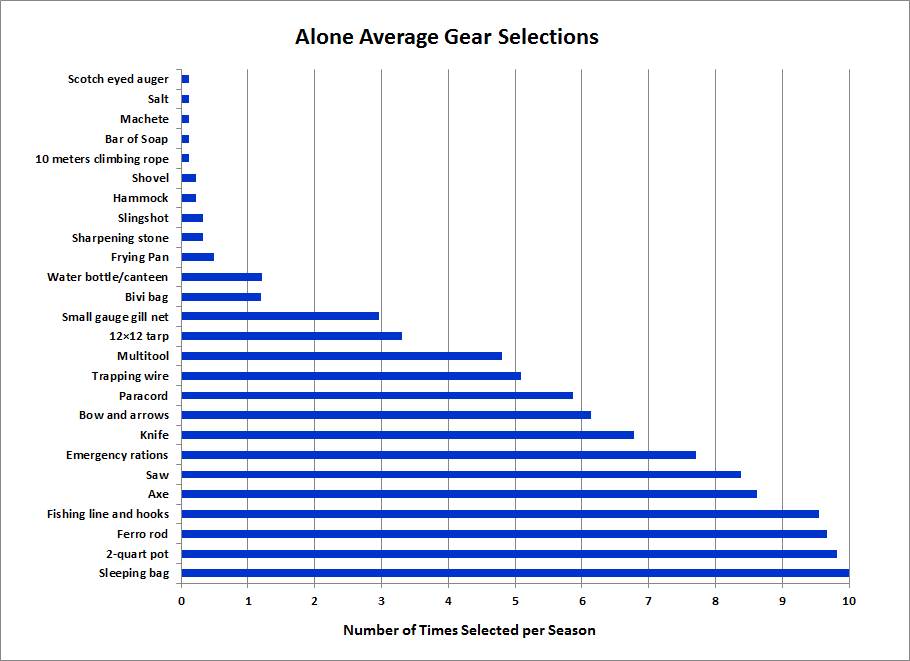
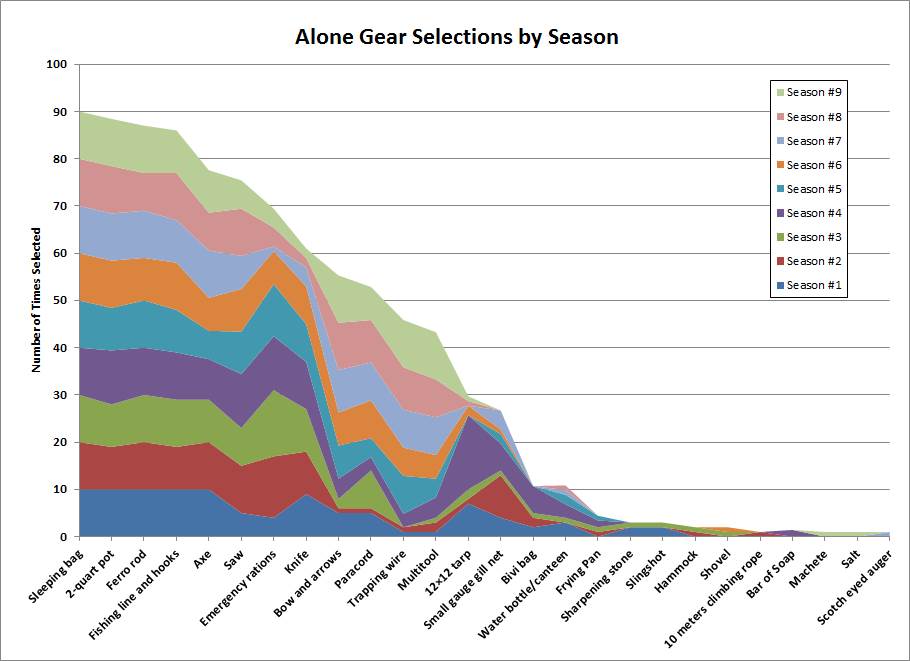
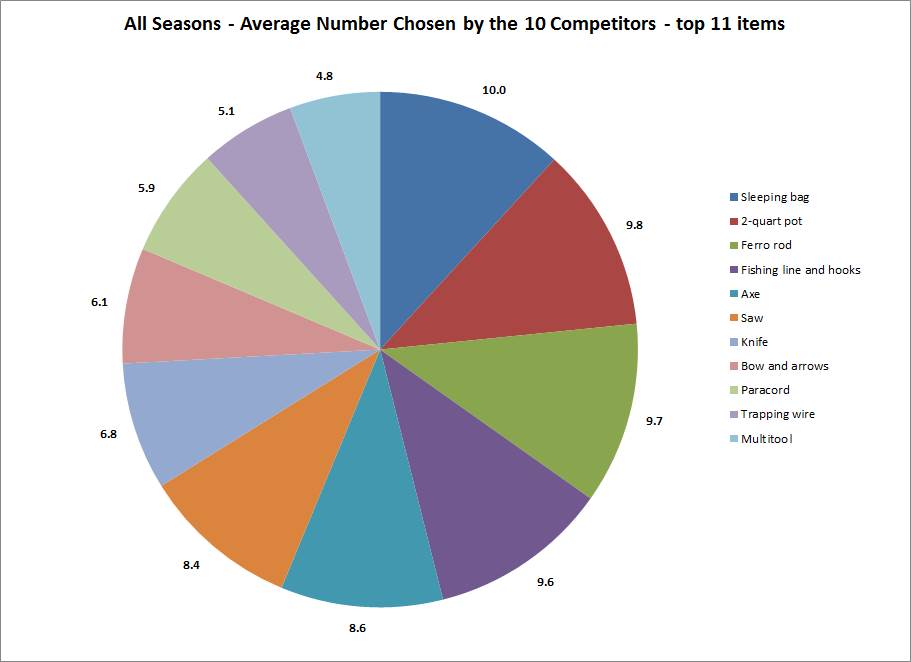
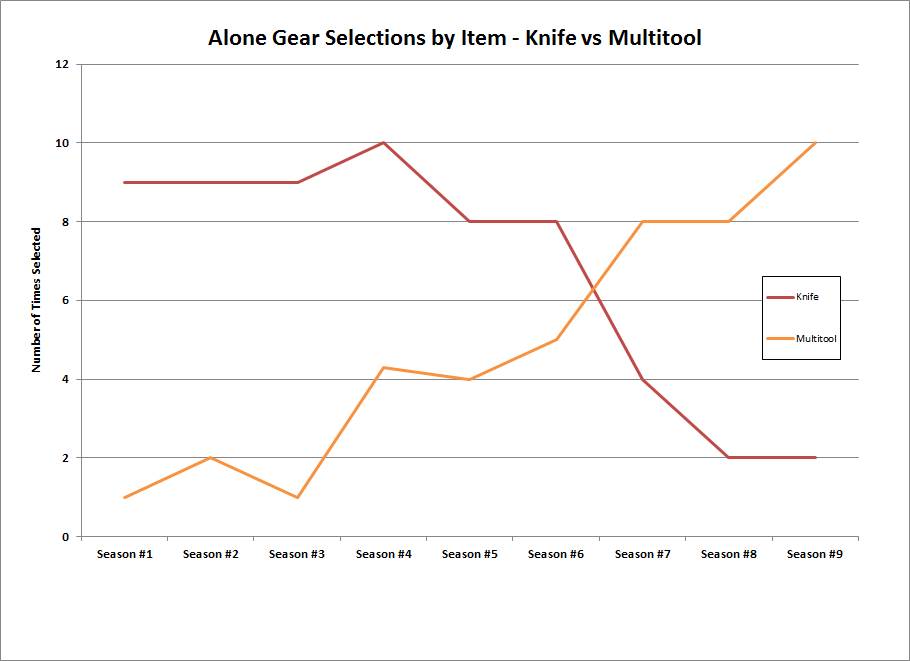
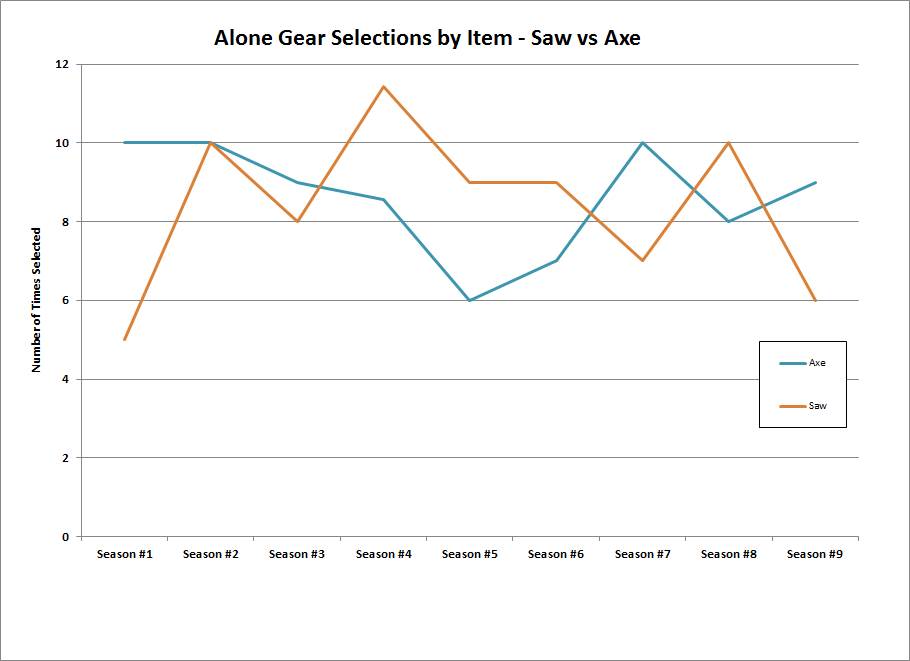
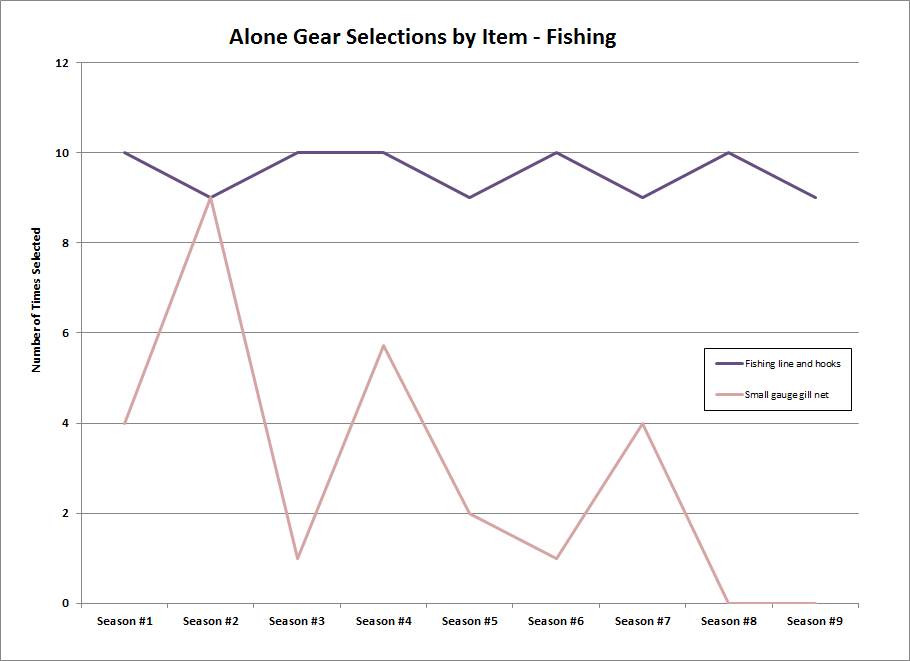
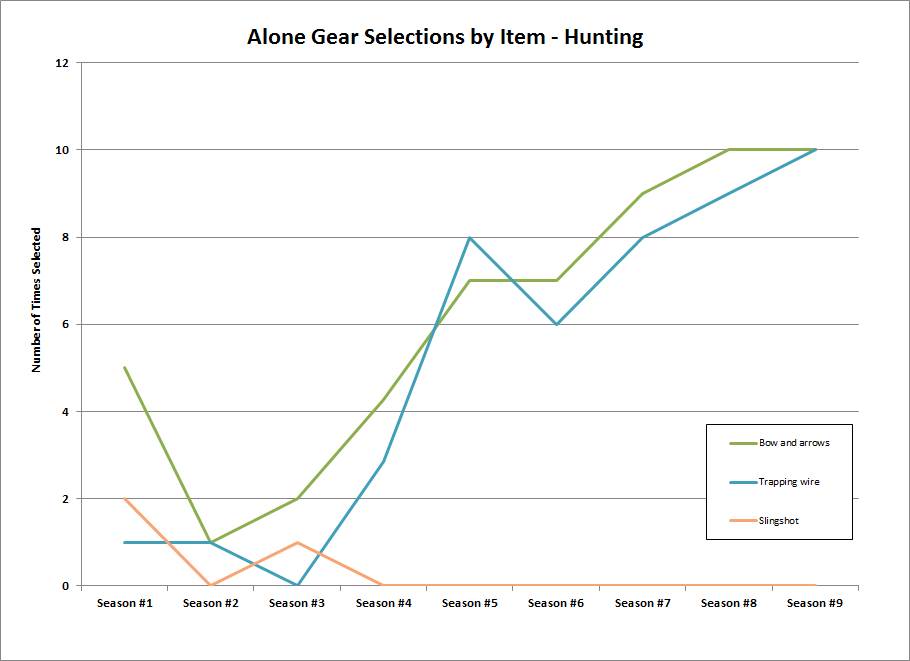
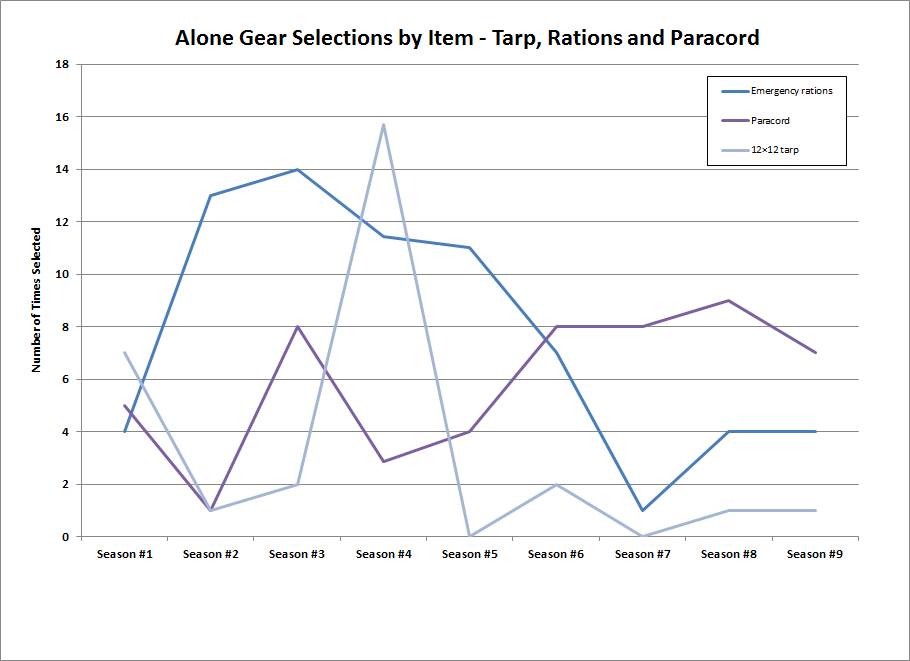
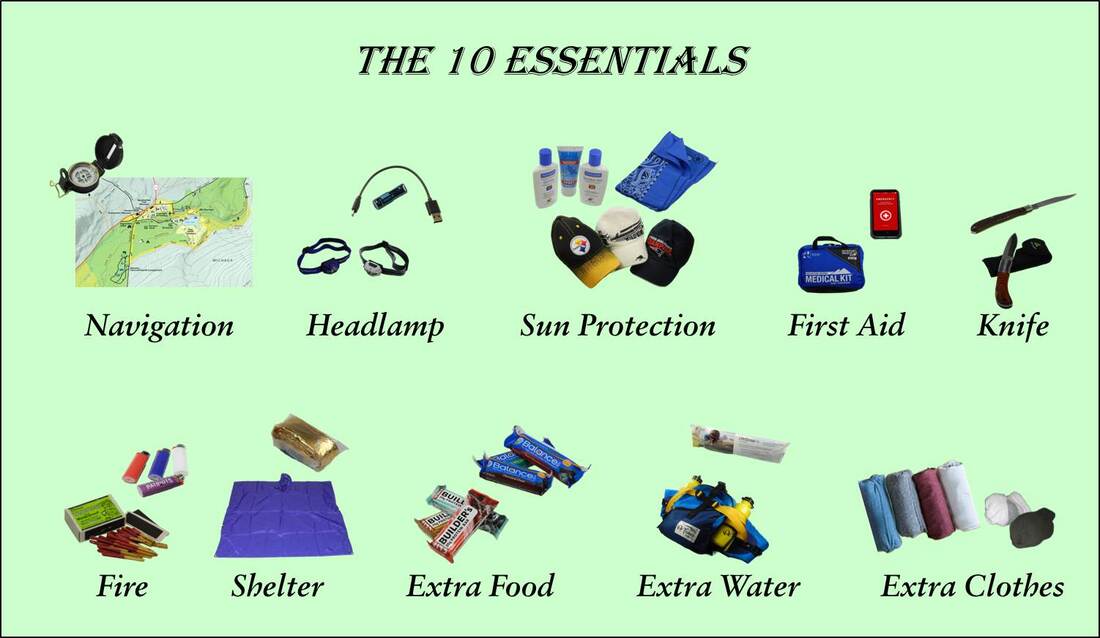
The 10 Items That the “Alone” Competitors Took into the Field to Keep Themselves Alive
(An Analysis of Season #1 through Season #9)

​Our previous post on the “10 Essentials” got us thinking. Since what to take with you on your outings into the wild is always a hot topic, we decided to look into the issue a little further – searching for significant “real world” examples based on actual data – not just anecdotal history.  Based on the fact that we like to get out there, we decided to investigate the opposite end of the spectrum from a day-hike that we covered in our “10 Essentials” blog and look into:
What’s the gear that you need to survive for an extended period of time in the wilderness?
In our opinion one great source of information related to the gear that you need to survive in the outback for months is the History Channel’s TV series “Alone”. If you haven’t seen it, Alone follows the daily self-documented activities of 10 individuals (seven paired teams in season 4) as they survive alone in the wilderness for as long as possible using a limited amount of survival gear. With the exception of medical check-ins, the participants are isolated from each other and all other humans. They may voluntarily quit at any time, or can be removed if they fail a medical check-in. The contestant who remains in the wild the longest wins a grand prize of $500,000.
Picture
​Some other people may quibble, but to us, an analysis of the 10 essential items that the Alone competitors took with them into the wild is a great window on what gear you really need – regardless of what all of the internet wisdom and sales people tell you that you need.
 
Over the 9 Seasons of Alone there have been 94 people that spent a total of 3,669 days in the outback (an average of 39 days per person – with the shortest being 6 hours for someone that was scared off by a bear encounter and the longest being 100 days) – so that’s a lot of great data to pour over.
 
To analyze their gear the first thing to look at is where the Alone competitors had to try to survive during each season - since these locations and filming dates were significant because the climate and weather conditions that they were trying to survive fundamentally impacted the gear that they needed (as it will on all of your adventures). 
Picture
​The locations that have been given for each season of Alone are as follows:
  • Season 1: Northern Vancouver Island, British Columbia, Canada (Fall 2014)
    • Oceanic to Subpolar Oceanic - Köppen Climate Region Cfb to Cfc
  • Season 2: Vancouver Island, Quatsino Territory, British Columbia (Fall 2015)
    • Oceanic to Subpolar Oceanic - Köppen Climate Region Cfb to Cfc
  • Season 3: Nahuel Huapi National Park, Patagonia, Argentina (Spring 2016)
    • Temperate oceanic/subtropical highland climate - Köppen Climate Region Cfb
  • Season 4: Vancouver Island, Quatsino Territory, British Columbia (Fall 2016)
    • Oceanic to Subpolar Oceanic - Köppen Climate Region Cfb to Cfc
  • Season 5: Zuunkharaa, Selenge, Mongolia - Northern Mongolia (Fall 2017)
    • Monsoon-influenced subarctic climate - Köppen Climate Region Dwc
  • Season 6: Great Slave Lake, Northwest Territories, Canada (Fall 2018)
    • Continental Subarctic Climate - Köppen Climate Region Dfc
  • Season 7: Great Slave Lake, Northwest Territories, Canada (Fall 2019)
    • Continental Subarctic Climate - Köppen Climate Region Dfc
  • Season 8: Chilko Lake, British Columbia (Fall 2020)
    • Continental Mediterranean Climate - Köppen Climate Region Dsb
  • Season 9: Big River, Labrador, Canada - Northeastern Labrador – Artic (Fall 2021)
    • Tundra Climate - Köppen Climate Region ET
​Here is a world map showing the Köppen–Geiger climate classification to help you better visualize the climate that the competitors had to survive in:
Picture
Picture
The winners and the number of days that they lasted in the wild are as follows:
  • Season 1: Alan Kay survived for 56 days
  • Season 2: David McIntyre survived for 66 days
  • Season 3: Zachary Fowler survived for 87 days
  • Season 4: Jim and Ted Baird survived for 75 days
    • This season had 7 teams of 2 people each that started 10 miles apart from each other
    • Fixed blade knives, ferro rods and sleeping bags were given to each competitor and did not count against their 10 items
  • Season 5: Sam Larson survived for 60 days
  • Season 6: Jordan Jonas survived for 77 days
  • Season 7: Roland Welker survived for 100 days
    • In this season the winnings of $1M were to be evenly divided  between any competitor that lasted 100 days; only Roland lasted that long.
    • Roland’s closest competitor was Callie Russell who made it 89 days before being medically extracted because she had frostbite on her toes.
  • Season 8: Clay Hayes survived for 74 days
  • Season 9: Juan Pablo Quiñonez survived for 78 days

What’s gear could the Alone competitors take with them?

​​To start their adventures the competitors select their gear for their time in the wilderness. To make it a level playing field the TV producers have developed a “Participant Gear List” as the basis for this selection. Here’s the listing from Season #9 that the competitors got to choose their gear from:
Clothing/Apparel/Personal Effects
Note: These items are allowed for all competitors and do not count towards their 10 special items, but competitors may not exceed the approved quota for each item:
  • 1 pair of high-leg hunting boots
  • 1 pair waterproof Arctic winter boots
  • 1 T-shirt
  • 1 fleece/wool shirt
  • 2 wool, fleece or cotton sweaters
  • 6 pairs wool socks
  • 2 hats
  • 2 buffs or neck gaiter
  • 1 shemagh or scarf
  • 4 pairs of gloves
  • 2 pairs of underwear/briefs
  • 1 insulated parka-style jacket
  • 2 pair of outdoor pants/bibs
  • 1 pair of fully insulated or waterproof winter pants/bibs
  • 1 waterproof un-insulated shell/Jacket
  • 2 pairs of thermal underwear
  • 1 pair of gaiters
  • 1 leather belt
  • 1 toothbrush
  • 1 pair of eyeglasses
  • 1 personal photograph
 
Additionally, each participant is given a satellite phone (for either dire emergency use or to call to say that they are quitting), life jacket, medical kit, camera batteries and a tarp to stop the rain from damaging the camera equipment.

10 Items Selection List
Notes: Participants are allowed to select 10 items from the following gear list.
  • Participants are responsible for sourcing and purchasing their 10 items.
  • Participants may only choose up to 2 Food items.
  • No duplicate items can be taken from the following list.
  • Any loops of string attached to any tool, weapon or used as a neck loop will be deducted from the participants 80m of paracord, cotton cord or trapping wire allowance.
 
  • Shelter
    • 12x12 ground cloth/tarp
    • 8-mm climbing rope - 10M
    • 550 Paracord - 80m
    • 3-mm cotton cord - 40m
 
  • Bedding
    • 1 multi-seasonal sleeping bag
    • 1 bivi bag
    • 1 sleeping pad
    • 1 hammock
 
  • Cooking
    • 1 large pot - 2 quarts
    • 1 steel frying pan
    • 1 flint or ferro rod set with standard-sized striker
    • 1 enamel bowl for eating
    • 1 spoon
    • 1 canteen/water bottle
 
  • Hygiene
    • 1 standard size bar of soap
    • 1 8-oz tube of toothpaste
    • 1 face flannel
    • 1 40-mm roll dental floss
    • 1 small bottle bio shower soap
    • 1 shaving razor
    • 1 towel
    • 1 comb
 
  • Hunting
    • 1 300-yd roll of a single-filament fishing line up to max of 20 lbs weight test + 35 assorted barbless hooks
    • 1 Primitive Bow Recurve or longbow + 9x Arrows
    • 1 small-gauge gill net
    • 1 slingshot/catapult + 30 steel ball bearings + 1 replacement band
    • 1 net foraging bag
    • 2 lbs of 20, 21 or 22-gauge stainless steel and/or brass trapping (snare) wire
    • 3 lbs of one solid block of salt
 
  • Food (2 items max)
    • 2 lbs of beef jerky
    • 2 lbs of dried pulses/legumes/lentils mix
    • 2 lbs of biltong
    • 2 lbs of hard tack military biscuits
    • 2 lbs of chocolate
    • 2 lbs of pemmican
    • 2 lbs of GORP
    • 2 lbs of flour
    • 2/3 lbs rice / 2/3 lb sugar / 2/3 lb of salt
 
  • Tools
    • 1 pocket knife
    • 1 hunting knife
    • 1 Leatherman multitool or similar
    • 1 sharpening stone
    • 1 roll of duct tape or 1 roll of electrical tape
    • 1 small shovel
    • 1 small sewing kit
    • 1 carabiner
    • 1 LED flashlight
    • 1 pair of ice spikes
    • 1 scotch-eyed auger
    • 1 adze
    • 1 2-handed draw knife
    • 1 hatchet
    • 1 saw
    • 1 axe

Prohibited Items
Note: This list is not exhaustive, any item not listed in the preceding lists inclusive above are prohibited items; this list serves as an illustration.
  • Fuel, lighters or matches
  • Bug spray/mosquito repellant
  • Sunscreen/chapstick
  • Sunglasses or prescription transition lens eyeglasses
  • Goggles
  • Beauty products
  • Map
  • Compass
  • Unapproved technology
  • Professional snares
  • Firearms of any kind
  • Ammunition
  • Explosives or gunpowder
  • Animal poison
  • Professional fishing rods
  • Fishing lures, flies, bait kits
  • Fishing traps
  • Food/beverage
  • Decoys
  • Animal calls
  • Tree stands
  • Professional bows/crossbows
  • Scopes of any kind
  • Tents or shelters
  • Stoves, pressure cookers or other cooking appliances
  • Hydration packs
  • Fire pits
  • Electric or propane lanterns
  • Inflatable boats
  • Filtration, purification devices, iodine tablets
  • Coolers or food storage boxes

​So what 10 pieces of gear did the competitors take into the outback during each season?
​The tables below show all of the 10 items of gear that the competitors selected on a season-by-season, person-by-person basis; color coded to identify which gear was most commonly taken and which gear was least common selected (click on any data table to enlarge it): ​
Picture
Season 1: Northern Vancouver Island, British Columbia, Canada (Fall 2014)
Picture
Season 2: Vancouver Island, Quatsino Territory, British Columbia (Fall 2015)
Picture
Season 3: Nahuel Huapi National Park, Patagonia, Argentina (Spring 2016)
Picture
Season 4: Vancouver Island, Quatsino Territory, British Columbia (Fall 2016)
Picture
Season 5: Zuunkharaa, Selenge, Mongolia - Northern Mongolia (Fall 2017)Season 5: 
Picture
Season 6: Great Slave Lake, Northwest Territories, Canada (Fall 2018)Season 6: 
Picture
Season 7: Great Slave Lake, Northwest Territories, Canada (Fall 2019)Season 7: 
Picture
Season 8: Chilko Lake, British Columbia (Fall 2020)Season 8: 
Picture
Season 9: Big River, Labrador, Canada - Northeastern Labrador – Artic (Fall 2021)Season 9: 
Picture

​So that you can see all of the selections in one place, here’s the listing of all the gear from all 9 seasons shown side-by-side in the rank order of how often the gear was taken:
Picture
Here you can see all of the gear selections relative to the other options based on their averages over all 9 seasons:
Picture
Here you can see how quickly the variability in the gear selections dropped off once the top 6 items were selected - and even more so after the top 11 items:
Picture
Here you can see how often the top 11 gear items were selected on average across all 9 seasons:
Picture

So what can we learn from the Alone participant gear data about the gear that you really need to have with you to survive in outback for an extended period of time?
Well quite a bit. First off, if you get a chance to choose which gear to take with you into the wild – here are the top 11 items that will help you survive if you’ll be out there for a while:
 
  1. Sleeping bag
    • It is imperative that you are able to be warm when needed and to get quality sleep – since without these your ability to perform your daily tasks will deteriorate.
  2. 2-quart cooking pot
    • This versatile piece of gear can be used to haul water, boil water to eliminate any parasites (like giardia, shigella and campylobacter), drink from and cook your meals.
  3. Ferro rod
    • Since fire is critical for warmth, water purification, meal preparation, nighttime protection from animals and your morale – having an easy way to start a fire is critical.
  4. Fishing line and hooks
    • If you are going to be “living off the land” you need protein and fat – fish give you both – so you need a way to catch them; passively if possible using a trotline.
  5. Axe
    • Being able to clear the land for a living space, obtain fire wood on a daily basis, and make all sorts of wilderness “furniture” and artifacts requires the ability to chop down and shape the forest around you.
  6. Saw
    • As many of the Alone competitors discovered an axe and a saw both cut wood, but they excel at significantly different functions and require different levels of energy. A saw is a much more efficient cutting tool - especially when cutting down standing dead trees or fallen trees and branches less than 6 inches in diameter. A saw is also better for most construction projects since the ends are smoother.
  7. Knife
    • A knife is irreplaceable for so many tasks and, in our opinion, for pure cutting they are far superior to any blade on a multitool; especially when you need leverage and strength. For tasks like cutting through wood or rope, gutting fish or dressing game you need a knife.
  8. Bow and arrows
    • If you are staying in the wilderness past 21 days you are going to need a substantial amount of food – and that means larger animals. The most efficient way to hunt these animals is using a bow – but you have to be judicious with your shots since losing an arrow can be very costly.
  9. Paracord
    • The ability to tie off items, lash together two logs, support a tarp, hang a bear bag, make a clothesline to dry off wet items, and a thousand other reasons requires some type of cordage. Paracord is strong and durable and weather resistant.
  10. Trapping wire
    • Like with fishing, if you are going to be “living off the land” you need protein and fat - and a way to obtain it; passively if possible. Although small game is not as substantial as larger game (one 18-ounce Wild Rabbit has ~583 calories, with ~108 grams of protein, fewer than 12 grams of fat and no carbohydrates), and doesn’t have the fat found in fish, having the ability to trap them without expending the effort to “hunt” them is a great way to augment your food supplies.
  11. Multitool
    1. In our opinion multitools are a mixed bag – they can do lots of tasks – but don’t do any of them that well; and they can’t replace a good camping knife. A multitool might come with pliers, a wire cutter, scissors, tweezers, a screwdriver, and several other functions, helping you cut down significantly on how much gear you carry, while a camping knife provides you with a single strong, sturdy blade. 

​Of course we also need to keep in mind the significant factors that influenced the Alone participant’s “10 items” gear choices:
 
  • The climate where the participants were located:
    • Seasons 1 - 4 were in Temperate climates - Köppen Climate Region C
    • Seasons 5 - 8 were in Continental climates -  Köppen Climate Region D
    • Season 9 was in a Polar climate - Köppen Climate Region E
  • Time of year was early fall transitioning into winter
  • Their living locations all had proximity to water
  • They were living in a fixed location versus traveling through the wilderness
  • Clothes were not included in the 10 items since they were specified for each competitor to level the playing field

​Examining the detailed data over the 9 seasons of Alone also shows a few other interesting items
In Season 1 nine people took knives and one person took a multitool, but by Season 9 all ten people took multitools and two people also took knives. Clearly showing the value that people place on the versatility of their multitools.
Picture
Over the 9 seasons on average 8.6 people took axes and 8.4 took saws - a clear indication of the recognition that both are valuable and have advantages and disadvantages depending on their use.
Picture
​Fishing with a line and hooks is consistently preferred as the method for fishing over gill nets. Note that for Season 8 the rules were modified due to local regulation prohibiting the use of gill nets until 45 days into the season.
Picture
​Two participants tried to use a slingshot in Season 1 and another tried in Season 3 - but since they were not successful - no participant has brought a slingshot since them. Conversely the use of Bows/Arrows and Trapping Wire have grown virtually every season to where in Season 9 all 10 participants selected both of these items as part of their gear.
Picture
​Tarps and Emergency Rations were popular selections up through Season 4 - but since then have declined in usage - probably based on their perceived limited usefulness when compared to other items. Paracord has increased in popularity - but is still only selected about 80% of the time. An interesting fact given the number of survival sites that say you “must” carry paracord with you.
Picture
We are not the only people intrigued by what we can learn from the History Channel’s Alone TV show. A couple of other websites have taken their shot at analyzing the Alone gear too – here’s one that we liked the best:

A look at the gear from every winner and runner-up of the TV show Alone
https://theprepared.com/blog/alone-winner-gear-analysis/  

So what gear would you take with you on Alone? 
​It’s something to think about before you head out on your next wilderness adventure.
Picture
0 Comments

The 10 Essentials

2/4/2023

0 Comments


The Gear That You Must Have in the Outback……probably

​Pretty much everybody in the Hiking, Camping and Shooting community knows about the main tenants of: “The Rule of 3”, “Leave No Trace” and the “4 Rules for Handling Firearms” (and we’ve written blog posts on all of them), but there’s one other tenant that we haven’t talked about - because it’s a little less agreed on; “The 10 Essentials” from The Mountaineers.
Picture
Since they say it best – here’s a passage directly from the Mountaineers website about this topic; “What Are the Ten Essentials?”
“The Mountaineers Ten Essentials™ dates back to our climbing courses of the 1930s. This widely respected safety and packing system was formalized in the third edition of Mountaineering: The Freedom of the Hills, released in 1974. Each of the nine editions of Freedom, as it is affectionately known, was written entirely by volunteers and reflects the collective wisdom of hundreds of outdoor skills instructors. The list has always sought to answer two basic questions:
 
Can you prevent emergencies and respond positively should one occur?
Can you safely spend a night (or more) outside?
 
The Mountaineers Ten Essentials was formalized in 1974 when the iconic list debuted in the third edition of “Mountaineering: The Freedom of the Hills.” The ninth edition of “Freedom” presented a thorough modernization to prepare today's mountaineers for adventures. Learn more about what to bring on your next trip and a limerick to help you remember all ten.
 
Certain equipment deserves space in every pack. Mountaineers will not need every item on every trip, but essential equipment can be a lifesaver in an emergency. Exactly how much equipment “insurance” should be carried is a matter of healthy debate.
 
Most members of The Mountaineers take along carefully selected items to survive the unexpected. Whatever your approach to equipment, a checklist will help you remember what to bring in the rush to get ready for a trip. But remember that The Ten Essentials is a guide that should be tailored to the nature of the outing. Weather, remoteness from help, and complexity should be factored into the selected essentials. The first seven essentials tend to be compact and vary little from trip to trip, and can be grouped together to facilitate packing. Add the needed digital and physical maps, the proper extra food, water, and clothes, and you’re ready to go. This brief list is intended to be easy to remember and serve as a mental pre-trip checklist.”
Picture
The most recent “10 Essentials” list espoused by the Mountaineers includes the following gear:
  1. Navigation: map, altimeter, compass, [GPS device], [PLB, satellite communicator, or satellite phone], [extra batteries or battery pack]
  2. Headlamp: plus extra batteries
  3. Sun protection: sunglasses, sun-protective clothes, and sunscreen
  4. First aid: including foot care and insect repellent (if required)
  5. Knife: plus repair kit
  6. Fire: matches, lighter and tinder, or stove as appropriate
  7. Shelter: carried at all times (can be a lightweight emergency bivy)
  8. Extra food: beyond minimum expectation
  9. Extra water: beyond minimum expectation, or the means to purify
  10. Extra clothes: sufficient to survive an emergency overnight
The Mountaineers even have a limerick to help remind you what the 10 Essentials are:
The Mountaineers Ten Essentials Limerick
By Steve McClure
 
To navigate, head for the sun
With first aid and knife on the run
Bring fire and shelter
Extra food is a helper
But water and clothes weigh a ton
The Mountaineer’s website has a 10-page article that discusses each of the 10 Essentials in detail – so we won’t go into them in this blog. If you want to read the Mountaineers’ article you can find it here:

What Are the Ten Essentials?
https://www.mountaineers.org/blog/what-are-the-ten-essentials
 
If you want to watch a short video covering the 10 Essentials you can find that here:
Ask a Ranger: 10 Essentials
Personally we always wear hiking boots and carry a day pack with some type of headgear, navigation aids, hydration, food, raingear, a First Aid kit and emergency supplies. You can see all the details on our Hiking page and its subpages.
​So what’s the controversy?

Well, as with most things in the Outdoor community lots of people have different opinions as to what is essential – and as technology improves other items grow in prominence.  For example, there’s a good article from Backpacker that discusses this topic in detail. In the article Dr. Nicholas Daniel, the associate director of the Dartmouth-Hitchcock Wilderness and Austere Medicine Fellowship (located in Lebanon, New Hampshire) wondered whether there was any data to back up the Mountaineers gear list:
“You hear it over and over again: ‘Were you prepared? Did you carry the Ten Essentials?’” Daniel says. “I thought that was a very interesting concept. As someone who practices wilderness medicine, has a scientific background, and spends a lot of time outdoors, the intersection between the recommendations and facts seemed important to me.
Picture
Even though the 10 Essentials list has been around for over 90 years, no study had ever been done to analyze this gear’s impact on a hikers’ adventures. So Dr. Daniel and his colleagues set out to determine if the 10 Essentials items improved hiking outcomes and which items were most critical to a hiker’s safety.
 
To collect the relevant data the team interviewed 961 day hikers at Mount Monadnock in New Hampshire (a rocky hike that we have done several times) asking them what gear they carried on their hike, what adverse events they experienced (1,686 were reported) and how satisfied they were with their hikes.

​The study’s main conclusion was that “Carrying more items did not translate into improved satisfaction for day hikers, but was associated with fewer events for which the hiker was unprepared.” Based on their observations, Dr. Daniel’s team suggested that it may be possible to cover the majority of adverse events with for day hikes with 4 of the 10 Essentials:  water, food, extra clothing, and a medical kit. However, since day hikes - similar to climbing the reasonably well marked shady trails of Mount Monadnock - may be less dangerous than multi-day trips, the researchers also recognized that the other 6 Essentials (navigation, headlamp, sun protection, knife, fire, and shelter) may be needed more often on longer hikes when more adverse events may occur.
 
Dr. Daniel also opined that there’s one more essential item he recommends hikers always carry, something that the original 1930’s Mountaineers list, and even the 1974 list could not have included – a cell phone.

You can read the entire Backpacker article here:
 
How “Essential” Are the Ten Essentials? A New Study Finds Some Help More Often Than Others
https://www.backpacker.com/survival/survival-gear/ten-essentials-less-important-than-you-think/
Picture
Dr. Daniel’s research team published a detailed paper detailing their efforts in the American Journal of Emergency Medicine. You can read it here:
 
Rethinking hiker preparedness: Association of carrying “10 essentials” with adverse events and satisfaction among day-hikers
https://www.sciencedirect.com/science/article/abs/pii/S0735675721005003
In addition, if you search the web you’ll find that almost every organization has their take on the 10 Essentials – with many of them adding their thoughts, additional information, essential item #11’s (such as insect repellent, a trash bag, etc.,) and alternative lists (to include lists of the 10 Essentials for hiking with dogs). We think that most of the discussion is valuable since being prepared with the right gear is always a good thing. Here are a few links to some other credible sources:
 
National Park Service: Ten Essentials
https://www.nps.gov/articles/10essentials.htm
 
American hiking Society: The Ten Essentials of Hiking - Ten Things You Should Bring on Every Hike
https://americanhiking.org/resources/10essentials/
 
The Sierra Club: Ten Essentials
https://angeles.sierraclub.org/outdoors/ten_essentials
 
The Boy Scouts of America: The Scout 10 essentials: Items every Scout needs in the outdoors
https://scoutingmagazine.org/2013/02/the-10-essentials/
 
The Boy Scouts of America: The Ten Essentials for Outdoor Activities
https://scouttroop116.com/10-essentials.html
 
The Boy Scouts of America: Scout 10 Essentials:
https://www.scouterlife.com/blog/2021/4/26/scout-10-essentials
 
REI: The Ten Essentials
https://www.rei.com/learn/expert-advice/ten-essentials.html
 
The 10 Hiking Essentials You Need to Safely Hit the Trail
https://www.freshoffthegrid.com/10-hiking-essentials/
 
The Ten Essentials for Hiking
https://www.iheartpacificnorthwest.com/blog_post/ten-essentials-for-hiking/
 
10 Essentials for Hiking with Dogs
https://www.sierra.com/blog/snow_sports/10-essentials-for-hiking-with-dogs/
Picture
0 Comments

Spring Flowers

6/18/2020

0 Comments


Nature’s Wonderful Colors

​Since tomorrow, 19 June, is the last day of Spring I thought that I would post a few of the photos that I took of the gorgeous flowers that bloomed in our neck of the woods this year.

​It was almost like nature wanted to show off what she could do to offset all of the other craziness spreading throughout the world. (click on any photo to start the slideshow):
​There’s nothing else to really say since the beauty of the flowers speak for themselves – so get out there and revel in Nature whenever you can.
Picture
0 Comments

Beautiful Night Sky Photos

1/15/2020

0 Comments


Giorgia Hofer Photography

​One of the things that we love the most about the outback is the clear night skies that allow you to see the moon and dramatic star scenes that are not visible from most locations due to light pollution. Many people try to capture the beauty of these sights, but in our opinion, few are as successful as Giorgia Hofer, an Italian photographer that’s a member of the Cortina Astronomical Association.
 
One of her photos that we really like is “Lunar Curve”, which shows the position and phases of the moon over 28 days. 
Picture
​Here’s a video showing some of Giorgia's beautiful work; “Starry Nights in the Dolomites”:
If you want to see more of her spectacular nighttime photos, here are direct links to Giorgia’s website:
 
        - Nightscapes: https://www.giorgiahoferphotography.com/nightscapes
 
        - Moon: https://www.giorgiahoferphotography.com/moon
 
        - Astrophotography: https://www.giorgiahoferphotography.com/astrophoto
​
Blog Post Update Note: This week we received a “Contact” note from Chris from Idaho that correctly pointed out that in our original blog post we had erroneously stated that Giorgia's “Lunar Curve” photo (which shows the position and phases of the moon over 28 days) was a composite of individual photos that were “taken from the same location at the same time of day”.
 
Chris correctly stated that “When viewing the sky at a particular time of day, roughly half of the moon phases will never be visible. For example, it is physically impossible for a third quarter moon to above the horizon between noon and midnight.”
 
Because of Chris’ comments we have corrected our initial post and thought that it would be a good idea to add some information about how to construct a moon phase photo similar to Giorgia Hofer’s - and how to take better nighttime photos of the moon.
 
To that end – here’s a video about making a moon phase panorama:

       How to make a Moon Phases Panorama (DSLR Lunar Photography)
And here are some other great information sources about shooting the moon:
 
1) Lunar Photography: How to Photograph the Moon
https://www.adorama.com/alc/lunar-photography-how-to-photograph-the-moon/
 
2) Ultimate Guide to Photographing the Moon
https://iceland-photo-tours.com/articles/photography-tutorials/ultimate-guide-to-photographing-the-moon
 
3) Moon Photography TUTORIAL Guide and Tips
As always, we appreciate Chris reading our blog and taking the time to point out our mistake so that we could correct it.
Picture
0 Comments

Knots Knowledge Can Save You Time and Trouble in the Outback

1/6/2020

0 Comments


Knots You Need to Know and Help to Remember How to Tie Them

This week we ran across an interesting article discussing the Massachusetts Institute of Technology’s (MIT’s) new mathematical model which predicts a knot's stability; “A New Mathematical Model Predicts a Knot's Stability” 
Picture
To examine the issue MIT mathematicians and engineers developed a mathematical model that predicts how stable a knot is based on several key properties, including the number of crossings and the direction in which the rope segments twist as the knot is pulled tight. "Empirical knowledge refined over centuries has crystallized out what the best knots are," said Mathias Kolle, the Rockwell International Career Development Associate Professor at MIT. But what exactly makes one knot more stable than another has not been well-understood, until now. "And now the model shows why."
 
In comparing the diagrams of knots of various strengths, the researchers were able to identify general "counting rules," or characteristics that determine a knot's stability. Basically, a knot is stronger if it has more strand crossings, as well as more "twist fluctuations" - changes in the direction of rotation from one strand segment to another. For instance, if a fiber segment is rotated to the left at one crossing and rotated to the right at a neighboring crossing as a knot is pulled tight, this creates a twist fluctuation and thus opposing friction, which adds stability to a knot. If, however, the segment is rotated in the same direction at two neighboring crossing, there is no twist fluctuation, and the strand is more likely to rotate and slip, producing a weaker knot. They also found that a knot can be made stronger if it has more "circulations," which they define as a region in a knot where two parallel strands loop against each other in opposite directions, like a circular flow.
 
If you do any Camping, and to a lesser extent Hiking, then a working knowledge of the most commonly used knots is essential. Based on our years of experience the 10 knots that we think it is critical for you to absolutely know are:
 
  • Square Knot
  • Figure Eight Knot
  • Clove Hitch
  • Sheet Bend
  • Bowline Knot
  • Taut-Line Hitch
  • Two Half Hitches
  • Sheepshank
  • Square Lash
  • Shear Lash
 
The problem is that there’s actually a lot to remember, especially if a significant amount of time passes between you actually tying these knots. So we use two items to help our memory as needed, and to give us information on other knots too. The first is the Ultimate Survival Technologies (UST’s) “Learn & Live” Knots card which has instructions and illustrations on how to tie 11 commonly used knots. You can see the details on this card, and the other 5 credit card sized cards that we think are valuable to have, on our Hiking/Emergency Supplies page. 
Picture
​The second item that we use to help us with knot knowledge is the “Knots 3D” app. What a great tool this is!  The $4.99 standalone app (i.e. no internet required) by Nynix is worth every penny since it shows you in detail how to tie 135 knots. 
Picture
The app includes the following information on each knot: best uses, other names that the knot is also known as, related knots, “Ashley Book of Knots” (ABOK) number, classification, structure, strength and reliability and a 3D animated video showing the knot being tied. In addition, the app allows you to:

  • Browse by knots by category (e.g. boating, camping, climbing, fishing, pioneering, scouting, fire & rescue, etc.,) or search by name, common synonym or ABOK #.
  • Show knots in both landscape and portrait modes - as well as full screen (Zoom in on a knot to see greater detail).
  • Watch knots tie themselves and pause or adjust the speed of the animation at any time
  • Rotate knots in 360 degrees, 3D views to study them from any angle with a swipe of a finger.
  • Interact with the knots on screen via multi-touch gestures such as pinch-to-zoom and swipe to tie/untie.
 
The Knots 3d app’s ability to rotate a knot to see the front, back and everything in-between is indispensable and provides interactivity you can't get from a knot book’s static photographs. You can get the app at the Apple Store, Google Play Store, or Amazon Store.
If you’re looking for other good information on knots used for camping, or survival, here are four good online articles that we recommend you take a look at:

5 Best Survival Knots – Strong Life Saving Knots You Need To Know
https://www.skilledsurvival.com/survival-knots/
 
Camping Knots: 6 Essential Knots Every Camper Needs to Know
https://coolofthewild.com/camping-knots/
 
The 7 Most Useful Survival Knots You Need to Know
https://www.primalsurvivor.net/survival-knots/
 
Essential Knots: How to Tie the 20 Knots You Need to Know
https://www.outdoorlife.com/photos/gallery/hunting/2012/02/essential-knots-how-tie-20-knots-will-keep-you-alive/

Picture
0 Comments

Are You Ready to Get Back Out There?

4/9/2019

0 Comments


Preparing for Hiking and Camping as Winter Ends

​The last remnants of snow are finally melting here in our part of New England – so it’s time to get serious about preparing for our Spring, Summer and Fall Hiking and Camping adventures. Given that we did some casual Winter hiking, in both the snow (to see the beauty of Nature after the big snowfalls) and on days when the trails were mostly clear between snowfalls, we’re not totally out of shape – but we’re also probably not ready to hike the most challenging parts of Mount Washington. So what’s our plan? 
Picture
Like most of you, we’re not professional hikers and consequently don’t have days of spare time each week to dedicate to training for our Hiking or Camping trips. So we try to train as efficiently as we can in the time that our schedules allow. And that training isn’t just for leg endurance – it also has to include strength and balance. So here’s what we do:

1) We start walking outside as soon as the snow melts and the local sidewalks and trails clear. It’s never too early to start Spring training – we just prefer to do it when there’s no snow on the ground since we find that it’s more efficient and we’re more motivated since we can watch Spring arrive as we walk. Try to take walks and short hikes at least three times a week.
 
2) Any walking is better than no walking. So we walk whenever we can – and we take the stairs where ever possible. After all, we’ve all seen those rocky uphill trails that look just like stairs – and leg-based cardio is a critical part of your training.
 
3) Since you’ll probably have a variety of different adventures during the upcoming months, it pays to give yourself up to a month to initially train. That way you can cover all your bases and be in reasonable shape (e.g. leg strength, arm strength, core strength, endurance, etc.,) before you hit the trails for the first time.
 
4) Since two of the most common hiking injuries are ankle sprains and rolling an ankle we try to make sure that we don’t just walk on flat terrain – especially since that’s not what you will find on your “real” hikes. We like to mix up our training terrain walks so that some of them are on flat ground, some hilly, some rocky, some uphill and some downhill. The better you can replicate the type of terrain that you will ultimately be hiking on during your training walks – the more prepared your body will be for what’s to come.
 
5) As with number #4, you need to walk in different weather conditions too – since that’s going to be the reality of your real adventures. Although this isn’t always the most exciting proposition, think of it as a great way to test out your gear. Are your boots waterproof enough? Does your jacket breathe when it gets wet? Do you need more or less layers of clothes? Do you need different socks for different weather conditions? Finding these things out on a short walk close to home is a lot better than dealing with them in the outback.
 
6) Wear the same boots that you plan on wearing on your Hiking adventures. This serves two purposes a) it makes sure that your boots are broken in and adapted to your feet, and b) it gets your legs used to the weight of the boots. I can’t tell you how many times I’ve had people complain on the trails that their boots feel so heavy only to find out that’s because they did all their training in lightweight running shoes.
 
7) In addition to walking you should probably plan on doing some crunches to build your core strength, some push-ups to build your upper body/arm strength, some step-ups to build up your quadriceps, calves, and hamstrings, and any other exercises that you think are applicable to the type of adventures you are planning (i.e. training for rock climbing requires different exercises than kayaking).
 
8) And finally, you should train with your backpack. Yes this might look a little odd when you are walking around your neighborhood, but trust us – you need to do this since the last thing you want to do is put on a 40 pound backpack for the first time when you hit the trail for that 3-day camping trip. Hint: A fully loaded backpack should probably not weigh more than 20% of your body weight.
Picture
As always, there are lots of great articles out there on the internet that will give you all sorts of ideas about how to get ready for Hiking and Camping season. Here are six that we found interesting:
 
   1) How to Get in Shape and Train for Hiking
         https://www.backpacker.com/skills/how-to-get-in-shape-for-hiking
 
   2) Training for Hiking
        https://www.rei.com/learn/expert-advice/hiking-training.html
 
   3) Quick and Efficient Training for Backpacking and Hiking
        http://www.adventurealan.com/quick-and-efficient-training-for-backpacking/
 
   4) How to Train for Hiking
        https://www.theadventurejunkies.com/how-to-train-for-hiking/
 
   5) Ultimate Hiking Workout: 6 Best Training Exercises for Hiking
         https://www.gore-tex.com/blog/hiking-workouts-exercises
 
   6) How to Prepare for Your Trekking Adventure: Our 10-Step Training Guide
        https://www.intrepidtravel.com/adventures/trekking-training-guide-tips/
​
Picture
0 Comments

On the Trails

3/25/2019

1 Comment


How Do You Say “Hi”?

​We all pass people on the trails as we hike – so this was too funny not to post.
Picture
Picture
1 Comment

The Secret to Mastering the Handgun

2/28/2019

1 Comment


Video by Alex Hommes - Operations Manager for the Silverado Shooting Academy

We’re always learning and looking for new sources of knowledge about both our gear and our techniques for all facets of Hiking, Camping and Shooting. Recently we came across a great video by Alex Hommes, the Operations Manager for the Silverado Shooting Academy (www.SilveradoShootingAcademy.com) in Orange County California about “The Secret to Mastering the Handgun​”.
​In the 18:57 minute video Alex covers the essential facts about shooting a handgun, and what you need to do to consistently hit what you are aiming at. The core of Alex’s video is that mechanical technique is 10% of the shooting process and that mental discipline is the other 90%. The problem that most people have with the mental part is due to the fact that we all have a natural aversion to holding onto things that explode. This aversion causes many people to lose their sight picture at the exact moment that they reach the trigger breakpoint – causing them to pull their aim off target. Alex calls this “reactive interference”.
 
This point of view really resonated with us – so we thought that we would share Alex’s video and some of the key points that he makes.  The video covers the following topics:
​          1) What is Handgun Mastery?
​          2) Why Handgun Shooting is Difficult
            ​          ​2a) Freeze the sight picture
            ​          2b) Squeeze the trigger without disrupting the sight picture
            ​          2c) Realign the sights on the target
            ​          2d) Reset the trigger
​          3) Neurophysiology 101
​          ​4) The "First Shot" Phenomenon
​          5) Classical Conditioning or "Reactive Interference"
​          6) The Paradox of the Handgun
​          7) Urban Legends of Handgun Shooting
​          8) The Problem with Conventional Training
​          9) The Zen of the Handgun
​          10) The Silverado Method
​          11) The Alternative Method: Habituation
​Here are some of the key points from Alex’s video that match our beliefs on what you need to do to enhance your handgun shooting abilities and increase you shooting accuracy.
“The handgun is the most difficult of all firearms to shoot effectively.”
 
“Don't rely on ‘spray and pray’.“
 
“Mastering the handgun is about controlling shot placement to the limit of your physical ability.”
 
“Shot placement is determined by one thing, and only one thing - the direction of the muzzle at the instant the bullet clears it. Your ability to control the shot depends on how well you can stabilize the gun while pulling the trigger.”
 
“We all have a natural aversion to holding on to things that explode. The lower animal part of our brain doesn't like concussion and tries to move us away from the gun at the same time our higher thinking brain is trying to carry out a new skill. This high brain - low brain conflict is why handguns are difficult to master.”
 
“A flinch will never mess up a shot because it is a reflex that happens after a loud sound. By the time the sound wave reaches you the bullet is already two feet out of the barrel. Nothing you do at that point will affect the shot.”
 
“After the first shot we will associate the trigger brake pressure applied by our trigger finger with the concussion of the gun. When we fire the gun again our anxiety level will increase as we increase pressure on the trigger. We will reflexively brace for the shot. Our reactive animal brain will have us take defensive action against the expected explosion right at the trigger breakpoint. These reactions interfere with the skill of handgun shooting. We call this ‘reactive interference’.”
 
“Reactive interference has nothing to do with good technique. It's the effect of the animal getting into the shooting process. If you can't control the animal your skill won't matter. You won't be able to apply that skill.”
 
“Conventional handgun training focuses on shooting as a mechanical technique and not a mental discipline. It applies technique to the problem of reactive interference leading to solutions that don't work very well.”
 
“….……..illusion that bad trigger technique is the major cause of handgun inaccuracy. In reality bad trigger pull will only produce minor variations in shot placement.”
 
“No technique is going to solve the problem of reactive interference.”
 
“Mastery of the handgun means eliminating reactive interference; getting the animal out of the shooting process. We can't eliminate our reflexes, but we can suppress them. All of the muscle movements involved with reactive interference are subject to voluntary control.”
 
“It's important that the closer you get to the trigger break the slower you increase the trigger pressure so that you can stop the trigger pull at the instant you become aware of bracing for the shot.”
 
“Once you can bring the trigger all the way back without bracing for the shot it's just a matter of being consistent while repeating this until you can do it faster.."
Like most of you we’ve watched way too many online videos. But we really liked this one. So, if you’re interested in improving your handgun shooting abilities, we highly recommend watching the Silverado Shooting Academy’s video on “The Secret to Mastering the Handgun”.
Picture
1 Comment

"Firefall" at Yosemite National Park

2/24/2019

0 Comments


Glacier Point vs Horsetail Fall

​This week you might have seen news about the "Firefall" at Yosemite National Park.
 
Technically this is the natural phenomena caused by the light hitting Horsetail Fall at just the right angle - not the manmade "Firefall" that was conducted at Glacier Point from 1872 until 1968 when people pushed glowing embers over the edge in a steady, controlled manner, resulting in a prolonged glittering cascade. 
Picture
Picture
Picture
​After the activities at Glacier Point were stopped in 1968 there were no Firefalls seen in Yosemite until February of 1973 when Galen Rowell took a photograph of sun light hitting Horsetail Fall in just the right manner that it caused what appeared to be a natural Firefall. It took a while for the Horsetail Fall Firefall to gain notoriety – but once the internet started publishing the stunning photos - people from all over the world started traveling to Yosemite to see the sight.
But, as we all know, Nature can be fickle, so the Horsetail Fall sight doesn’t always appear; the conditions have to be just right.  There has to be enough snowpack for Horsetail Fall to be flowing and the daytime temperatures have to be warm enough to melt the snowpack. If the water is actually flowing over Horsetail Fall then the western sky has to be clear at sunset so that the sun’s rays hit the water as it flows over the falls. Even with perfect conditions the Firefall is only visible for approximately 10 minutes.
 
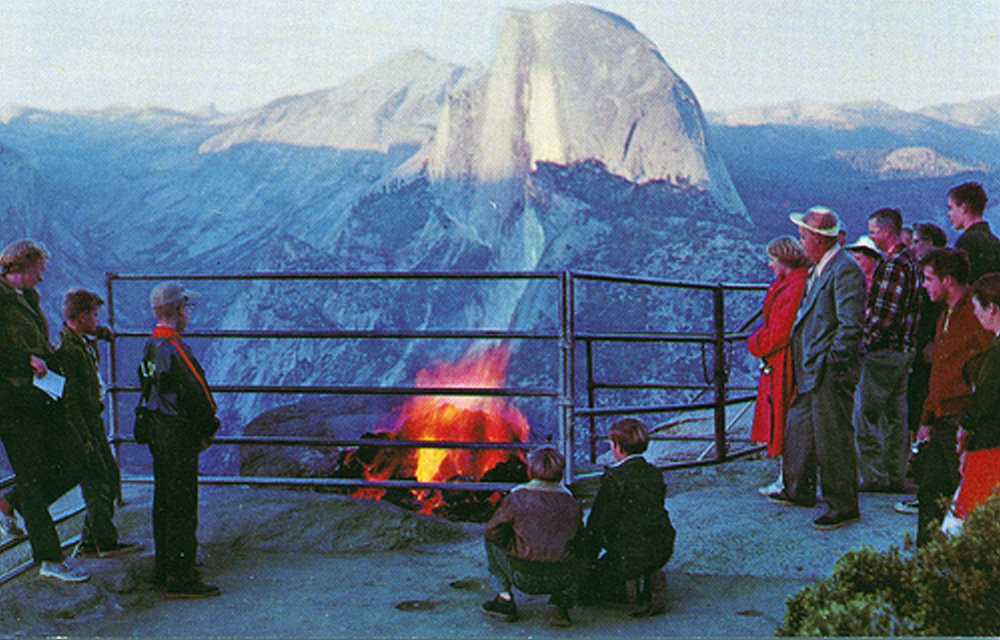
Whatever it is - it's stunning.
 
If you want to read more about both Glacier Point and Horsetail Fall here's a website by James Kaiser with a great write-up on both.

https://yosemitefirefall.com/yosemite-firefall-glacier-point/
 
https://yosemitefirefall.com/yosemite-firefall-horsetail-fall/
​
Picture
0 Comments
<<Previous

    What's On This Page?

    Here's where we post reviews, questions, answers, thoughts and other information that's of general interest to our followers in a blog format.

    Categories

    All
    Adventures
    Camping
    Disaster Preparedness
    Hiking
    Interesting Gear
    New Gear
    Our Thoughts
    Shooting
    Site Additions
    Trade Shows
    Website Statistics

    Archives

    August 2023
    June 2023
    March 2023
    February 2023
    January 2023
    December 2022
    November 2022
    October 2022
    September 2022
    August 2022
    July 2022
    June 2022
    May 2022
    April 2022
    March 2022
    February 2022
    January 2022
    December 2021
    November 2021
    October 2021
    September 2021
    August 2021
    July 2021
    June 2021
    May 2021
    April 2021
    March 2021
    February 2021
    January 2021
    December 2020
    November 2020
    October 2020
    September 2020
    August 2020
    July 2020
    June 2020
    May 2020
    April 2020
    March 2020
    February 2020
    January 2020
    December 2019
    November 2019
    October 2019
    September 2019
    August 2019
    July 2019
    June 2019
    May 2019
    April 2019
    March 2019
    February 2019
    January 2019
    December 2018
    November 2018
    October 2018
    September 2018
    August 2018
    July 2018
    June 2018
    May 2018
    April 2018
    March 2018
    February 2018
    January 2018
    December 2017
    November 2017
    October 2017
    September 2017
    August 2017
    July 2017
    June 2017
    May 2017
    April 2017
    March 2017
    February 2017
    January 2017
    December 2016
    November 2016
    October 2016
    September 2016
    July 2016
    June 2016
    May 2016

    RSS Feed

Home
Hiking
Camping
Shooting
Disaster Preparedness

Adventures
Blog 
About

Contact
​Privacy Policy
Legal and Copyright Disclaimers

               Copyright 2016-2023 Hiking, Camping and Shooting
  • Home
  • Hiking
    • Footwear
    • Headgear
    • Navigation
    • Hydration
    • Food
    • Photography
    • Raingear
    • First Aid
    • Emergency Supplies
    • Day Pack
  • Camping
    • Shelter
    • Sleeping
    • Hydration
    • Cooking
    • Tools
    • Light
    • Electronics
    • First Aid
    • Maps and Books
    • Organization and Storage
    • Disaster Preparedness
  • Shooting
    • Handguns
    • Carbines
    • Rifles
    • Shotguns
    • Magazines
    • Optics and Mounts
    • Shrouds and Accessories
    • Slings
    • Holsters
    • Loaders
    • Carrying Cases
    • Safety Items
    • Range Items and Tools
    • Targets
    • Ammunition
    • Cleaning Supplies
    • Gun and Ammo Storage
  • Adventures
    • North America
    • Europe
    • Oceania
    • Asia
    • South and Central America
    • Middle East
  • Blog
  • About
  • Contact